I want to save data and images of detectors automatically with ZPL.
So I made the ZPL code as below.
For n = 2, 6, 1

    ####### get Detector viewer in img.

    winnum = n+1

    OpenAnalysisWindow "Dvr", cfgpath$

    ExportJPG winnum, imgfile$


    ####### get Detector viewer in dat.

    #ModifySettings cfgtxt$, DVW_SHOW, 1 # extraction middle row data from 2d data

    GetTextFile datfile$, "Dvr", cfgtxt$ , 1

    ConvertFileFormat datfile$, 1   #Unicode to ANSI

Next
Once I open all detector viewer windows, I tried to save images and data in detector number order.
However, I couldn’t save each detector data/image because it cannot recognize the number of detector in this code.
What should I do?
Or, are there better method to do it?
Please help me.
Thanks in advance.
Best answer by Allie
Hi all,
The general set of steps for something like this should be the following:
If you haven’t already, save the detector settings. This will create a CFG file for use in the code
In the ZPL, write a loop to cycle through all of the detectors
Use MODIFYSETTINGS to change the detector of interest. This is done with DVW_DETECTOR. The number must match the number of the detector in the Non-Sequential Component Editor
Use OPENANALYSISWINDOW to open a Detector Viewer window with the new settings
Save the image of the window with EXPORTJPG. Note: This is equivalent to taking a screenshot of the analysis window, so it will probably be best to ensure the window opens without docking.
If you want, save the text output as well with GETTEXTFILE
Close the analysis window. This ensures your workspace does not get too crowded.
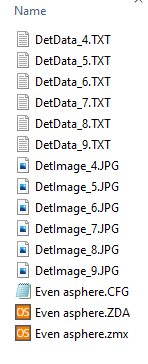
I am attaching a ZPL macro which walks through these steps. The macro will save the detector image and text information to the working directory. The filenames are updated with the detector number.
The general set of steps for something like this should be the following:
If you haven’t already, save the detector settings. This will create a CFG file for use in the code
In the ZPL, write a loop to cycle through all of the detectors
Use MODIFYSETTINGS to change the detector of interest. This is done with DVW_DETECTOR. The number must match the number of the detector in the Non-Sequential Component Editor
Use OPENANALYSISWINDOW to open a Detector Viewer window with the new settings
Save the image of the window with EXPORTJPG. Note: This is equivalent to taking a screenshot of the analysis window, so it will probably be best to ensure the window opens without docking.
If you want, save the text output as well with GETTEXTFILE
Close the analysis window. This ensures your workspace does not get too crowded.
I am attaching a ZPL macro which walks through these steps. The macro will save the detector image and text information to the working directory. The filenames are updated with the detector number.
I tested your macro. I wanted to save the image of the detector viewer (incoherent irradiance, cross section row) and the values. The saving of the cross section values worked. But the saved image does not show the cross section. It shows the inverse grey scale data. Can you tell me what’s wrong here.
What exactly means “saving the detector settings”? What I did before executing the macro was opening the detector viewer, setting the parameters like “Show as:” and “Show Data:” and then clicking “Save”.
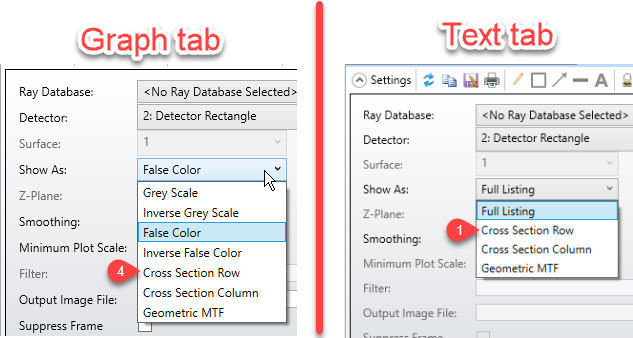
Because of the difference in integer values between the Graph and Text tabs, you will need to use MODIFYSETTINGS twice in one iteration: once before saving the text file, and once before saving the graph file.
As for saving the detector settings - you did it right. When I say to save, I mean this: open the Detector Viewer settings dialog and click Save. That way, a CFG file is created for you to modify with the code I provided.
In my code, those two lines are used to find Detector objects. This allows me to run the code without first storing the object numbers of each of the detectors.
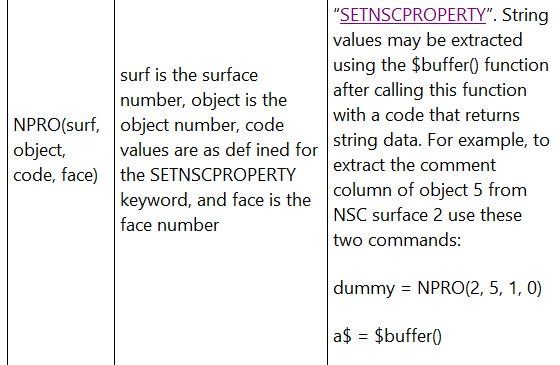
In your message, line #1 reports a property of a Non-Sequential object. With Code = 0, the property I’m reporting is the name of the object (aka the type). For Detector Rectangles, that will return “NSC_DETE.” In this case, we are using a Numeric Function to report the type. The output of a Numeric Function is a number (integer or double). When NPRO returns a string, that string is sent to the buffer. Then, the value may be extracted by line #2 in your post.
Is there a way to save the detector file name as the detector comment column?
Hi Michael,
In that case you may modify Allie’s code “type=NPRO(1,obj,0,0)” to “comment=NPRO(1,obj,1,0)”. The third argument “code” is described in the help file of “SETNSCPROPERTY(keywords)”: 0 for object type and 1 for object comment.
When I was running the sample code Zemax returns error message “Unable to capture analysis window – timeout occurred waiting for rendering to complete.” What should I do in this case? @Allie@David Nguyen
When I was running the sample code Zemax returns error message “Unable to capture analysis window – timeout occurred waiting for rendering to complete.” What should I do in this case? @Allie@David Nguyen
Regards,
Jiang
Dear all,
I would like to share that I fixed the issue mentioned above. The issue was caused, I think, by not clicking the OK button to close the new analysis window. Thus, I used “UPDATE ALL” the my code shown below. Moreover, when using the “MODIFYSETTINGS” command, I pointed to the “DVR.CFG” configuration file in the default Zemax config folder (where your configuration file is saved after clicking the “Save” button of Detector Viewer window), instead of the configuration file with the same ZMX file name (“cfgFilename$” below). In my code below, “6” was used because I have only one detector (object 6) in my lens editor. Also, when you use “DVW_SHOW” the dropdown menu entries begin with 0.
FORMAT 1 INT A$ = path$ + "DetImage_" + $STR(6) + ".JPG" B$ = path$ + "DetData_" + $STR(6) + ".TXT" type = NPRO(1, 6, 0, 0) type$ = $BUFFER() ! Check if the object type is a detector. If yes, continue IF (type$ $== "NSC_DETE") ! Update the settings with the detector number MODIFYSETTINGS cfgfile$, DVW_DETECTOR, 6 MODIFYSETTINGS cfgfile$, DVW_SHOW, 5 ! With the new settings, open a window and take an image of what is there OPENANALYSISWINDOW DVR, cfgfile$ UPDATE ALL winVal = WINN() EXPORTJPG winVal, A$ CLOSEWINDOW winVal ! Additionally, save the detector data as a text file MODIFYSETTINGS cfgfile$, DVW_SHOW, 2 MODIFYSETTINGS cfgfile$, DVW_DATA, 4 !UPDATE ALL GETTEXTFILE B$, DVR, cfgfile$ ENDIF
We use 3 different kinds of cookies. You can choose which cookies you want to accept. We need basic cookies to make this site work, therefore these are the minimum you can select. Learn more about our cookies.