

All the information below is obsolete. Please refer to this knowledge base article for full information.
Introduction to Enhanced Ray Aiming and Ray Aiming Wizard
Q: What is this?
Starting from 21.1, we have added experimental feature for the Ray-Aiming algorithm, which are supposed to solve Ray-Aiming problems in some extreme user cases or novel application designs. In these challenging cases, the current Ray-Aiming algorithm usually has hard time to find the chief ray that hitting STOP center for the problematic field.
Since the new algorithm is still in beta testing, it’s not enabled by default. Users need to explicitly turn on the feature in order to test the new function.
Q: What problems does the experimental feature solve?
A system with Ray-Aiming problems can end up in many different syndromes. The following are a few examples. Note it’s important to know the following error could be caused by other reasons but not Ray-Aiming. It could be the system has reached the physical limitation and the chief ray just doesn’t exist.
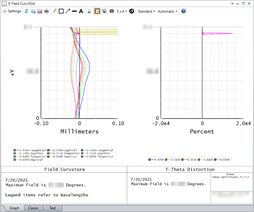
1. Spikes in analysis windows.
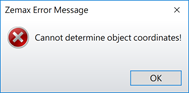
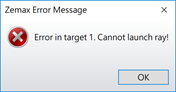
2. OpticStudio throws errors like below.
Q: How can I enable the new algorithm?
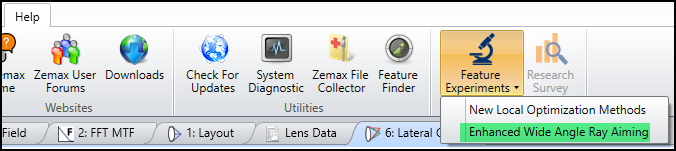
The experimental improvements can be turned on by checking the option of “Help > Feature Experiment > Enhanced Wide Angle Ray Aiming”, as highlighted below.
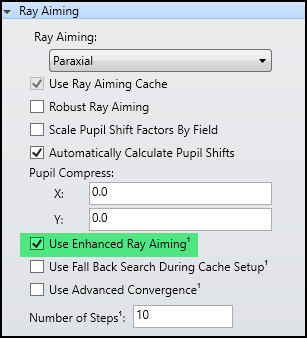
After turning this on, we need to go to System Explorer to further check “Use Enhanced Ray Aiming” to use the new algorithm.
Q: I enabled it via Feature Experiment, but it’s still gray.
In OpticStudio 21.3, we have limited this function to only work for the following conditions.
- System Aperture must be Float By Stop Size.
- The field type can only be Object Height or Angle.
- If the field type is Angle, the object must be at infinity.
- If the field type is Object Height, the object must be at finite distance.
The reason we add these restriction is the algorithm is not well designed for other conditions yet. We will work on other conditions and open them as soon as possible.
Q: What does these options mean?
Use Enhanced Ray Aiming turns on the new algorithm.
The Use Advanced Convergence option was designed to handle cases with substantial rotations around the z-axis, though it may be useful for other cases.
Use Fallback Search During Cache Setup was originally implemented to fix certain off axis or aspherical systems. We recommend keeping it off unless there are problems, in which case you can use the option selection workflow below.
Number of Steps sets the number of steps during the cache setup. We recommend using the default value, unless there are problems, in which case you can try increasing the value as a possible fix. In general, higher values will be more stable but slower. See the suggested workflow for selecting options below.
Q: What if I still have problems?
Please contact support@zemax.com if you have any problematic system and you are not sure whether it’s about ray-aiming issue or physical limitations.
Q: How can I turn on the new algorithm in ZOS-API?
Here is the code snippet in C#.
//Turn on experimental ray aiming
var ldeRow0 = sys.LDE.GetRowAt(0);
if (ldeRow0 != null)
{
var cellConic = ldeRow0.GetCellAt((int)ZOSAPI.Editors.LDE.SurfaceColumn.Conic);
if (cellConic != null)
{
cellConic.Value = "RAEXPERIMENT";
}
}