Efficiency Tips & Tricks for OpticStudio


Alissa Wilczynski
Zemax Staff
Forum|alt.badge.img+3

Share your tips & tricks for efficiently using OpticStudio with the community! 

There are lots of little ways that we adapt our use of OpticStudio to streamline our work. These are usually learned over time, from colleagues, or from technical support, but they aren't typically found in other product education resources. You might have a favorite keyboard shortcut, saved settings for a particular analysis, a macro that automates 3 steps in your process tied to a hotkey, or a million other ideas. Help your fellow OpticStudio users and learn some new tricks yourself.

Did this topic help you find an answer to your question?

39 replies

Forum|alt.badge.img

thanks…


MichaelH
Ansys Staff
Forum|alt.badge.img+2
  • Ansys Staff
  • 376 replies
  • April 3, 2025

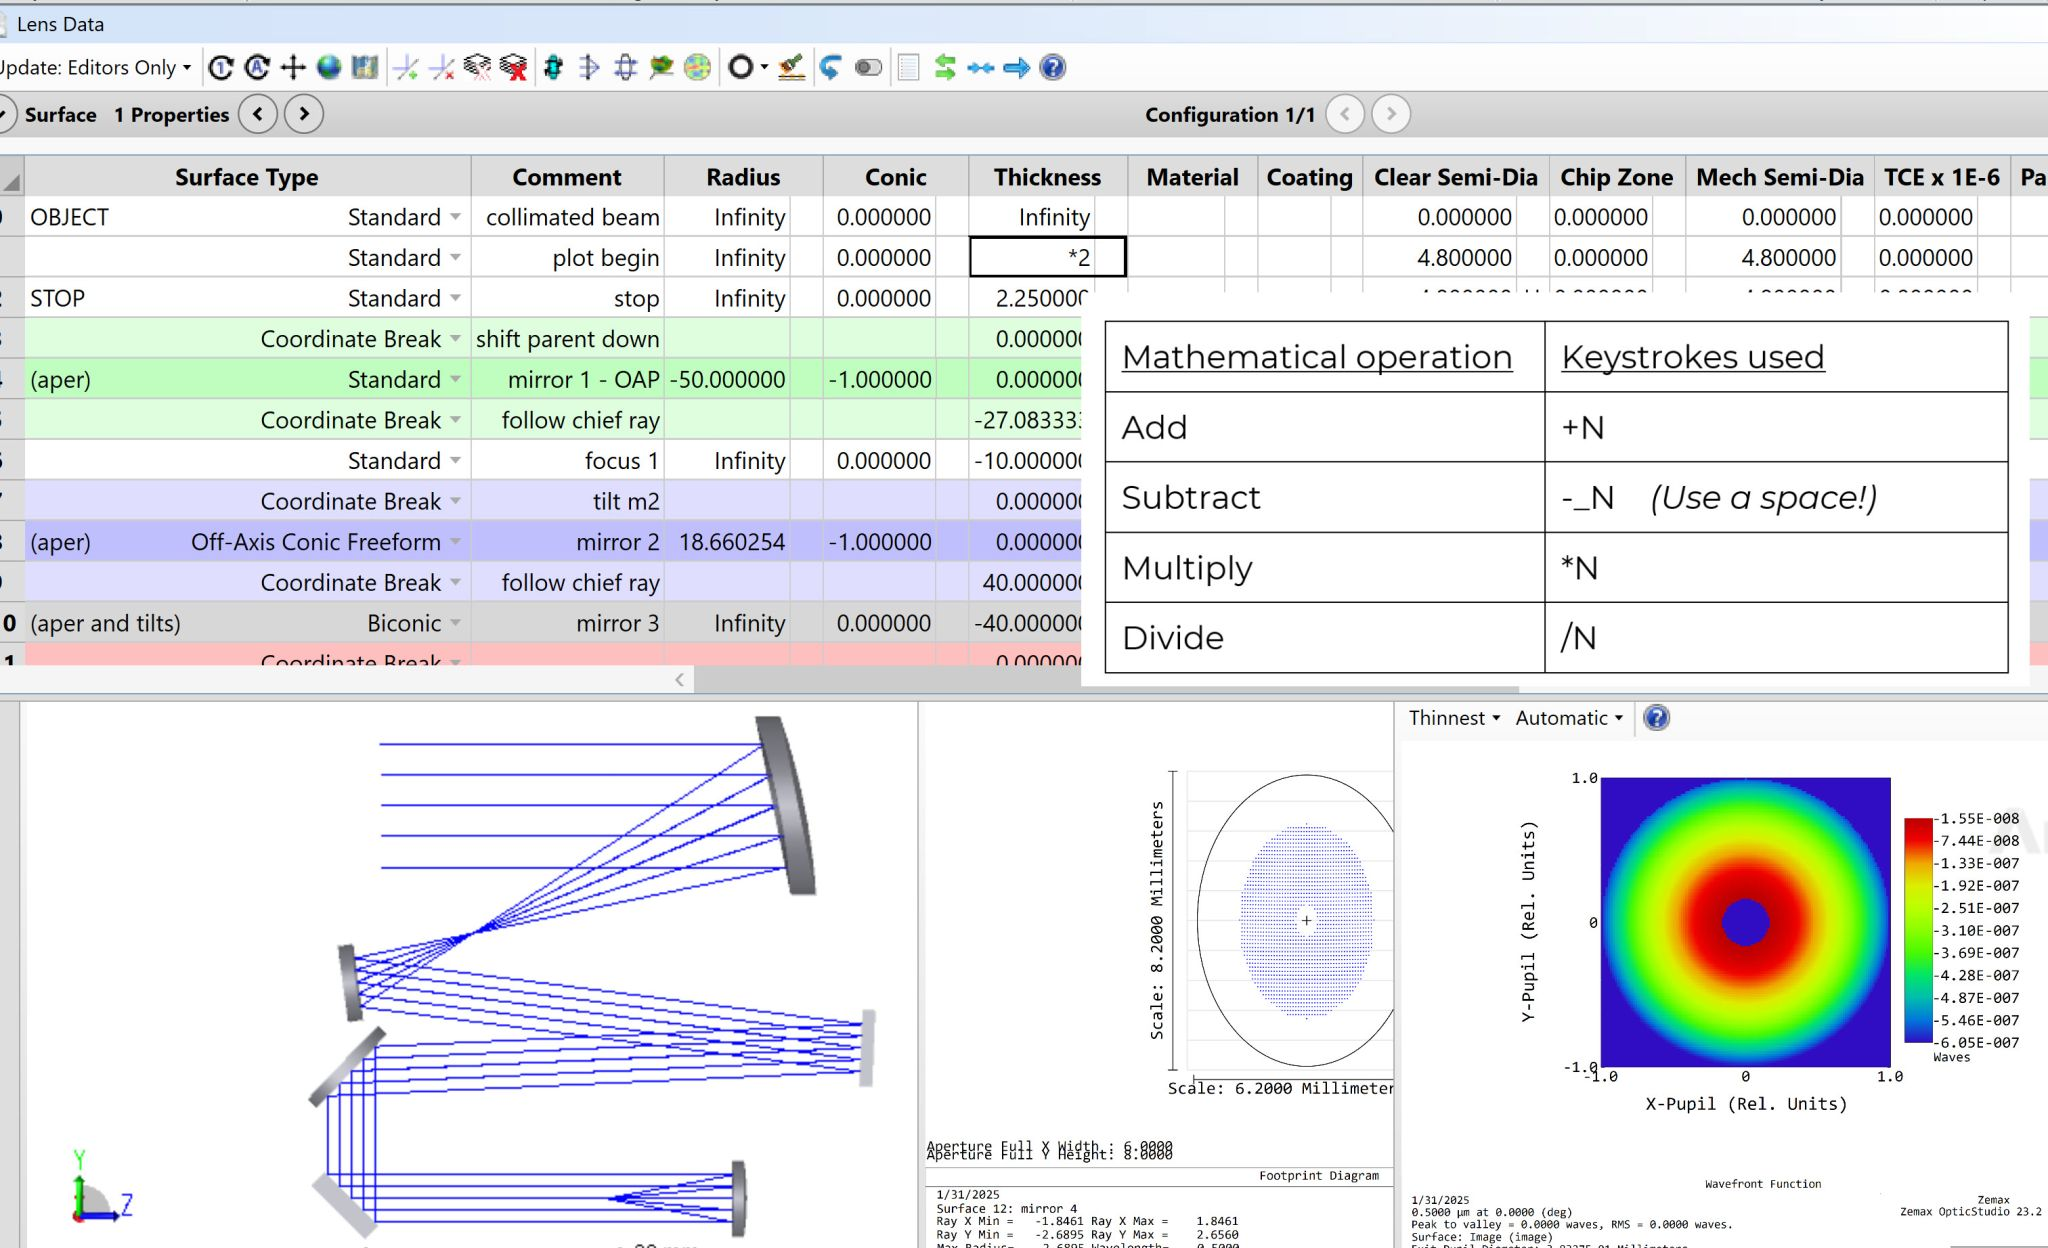
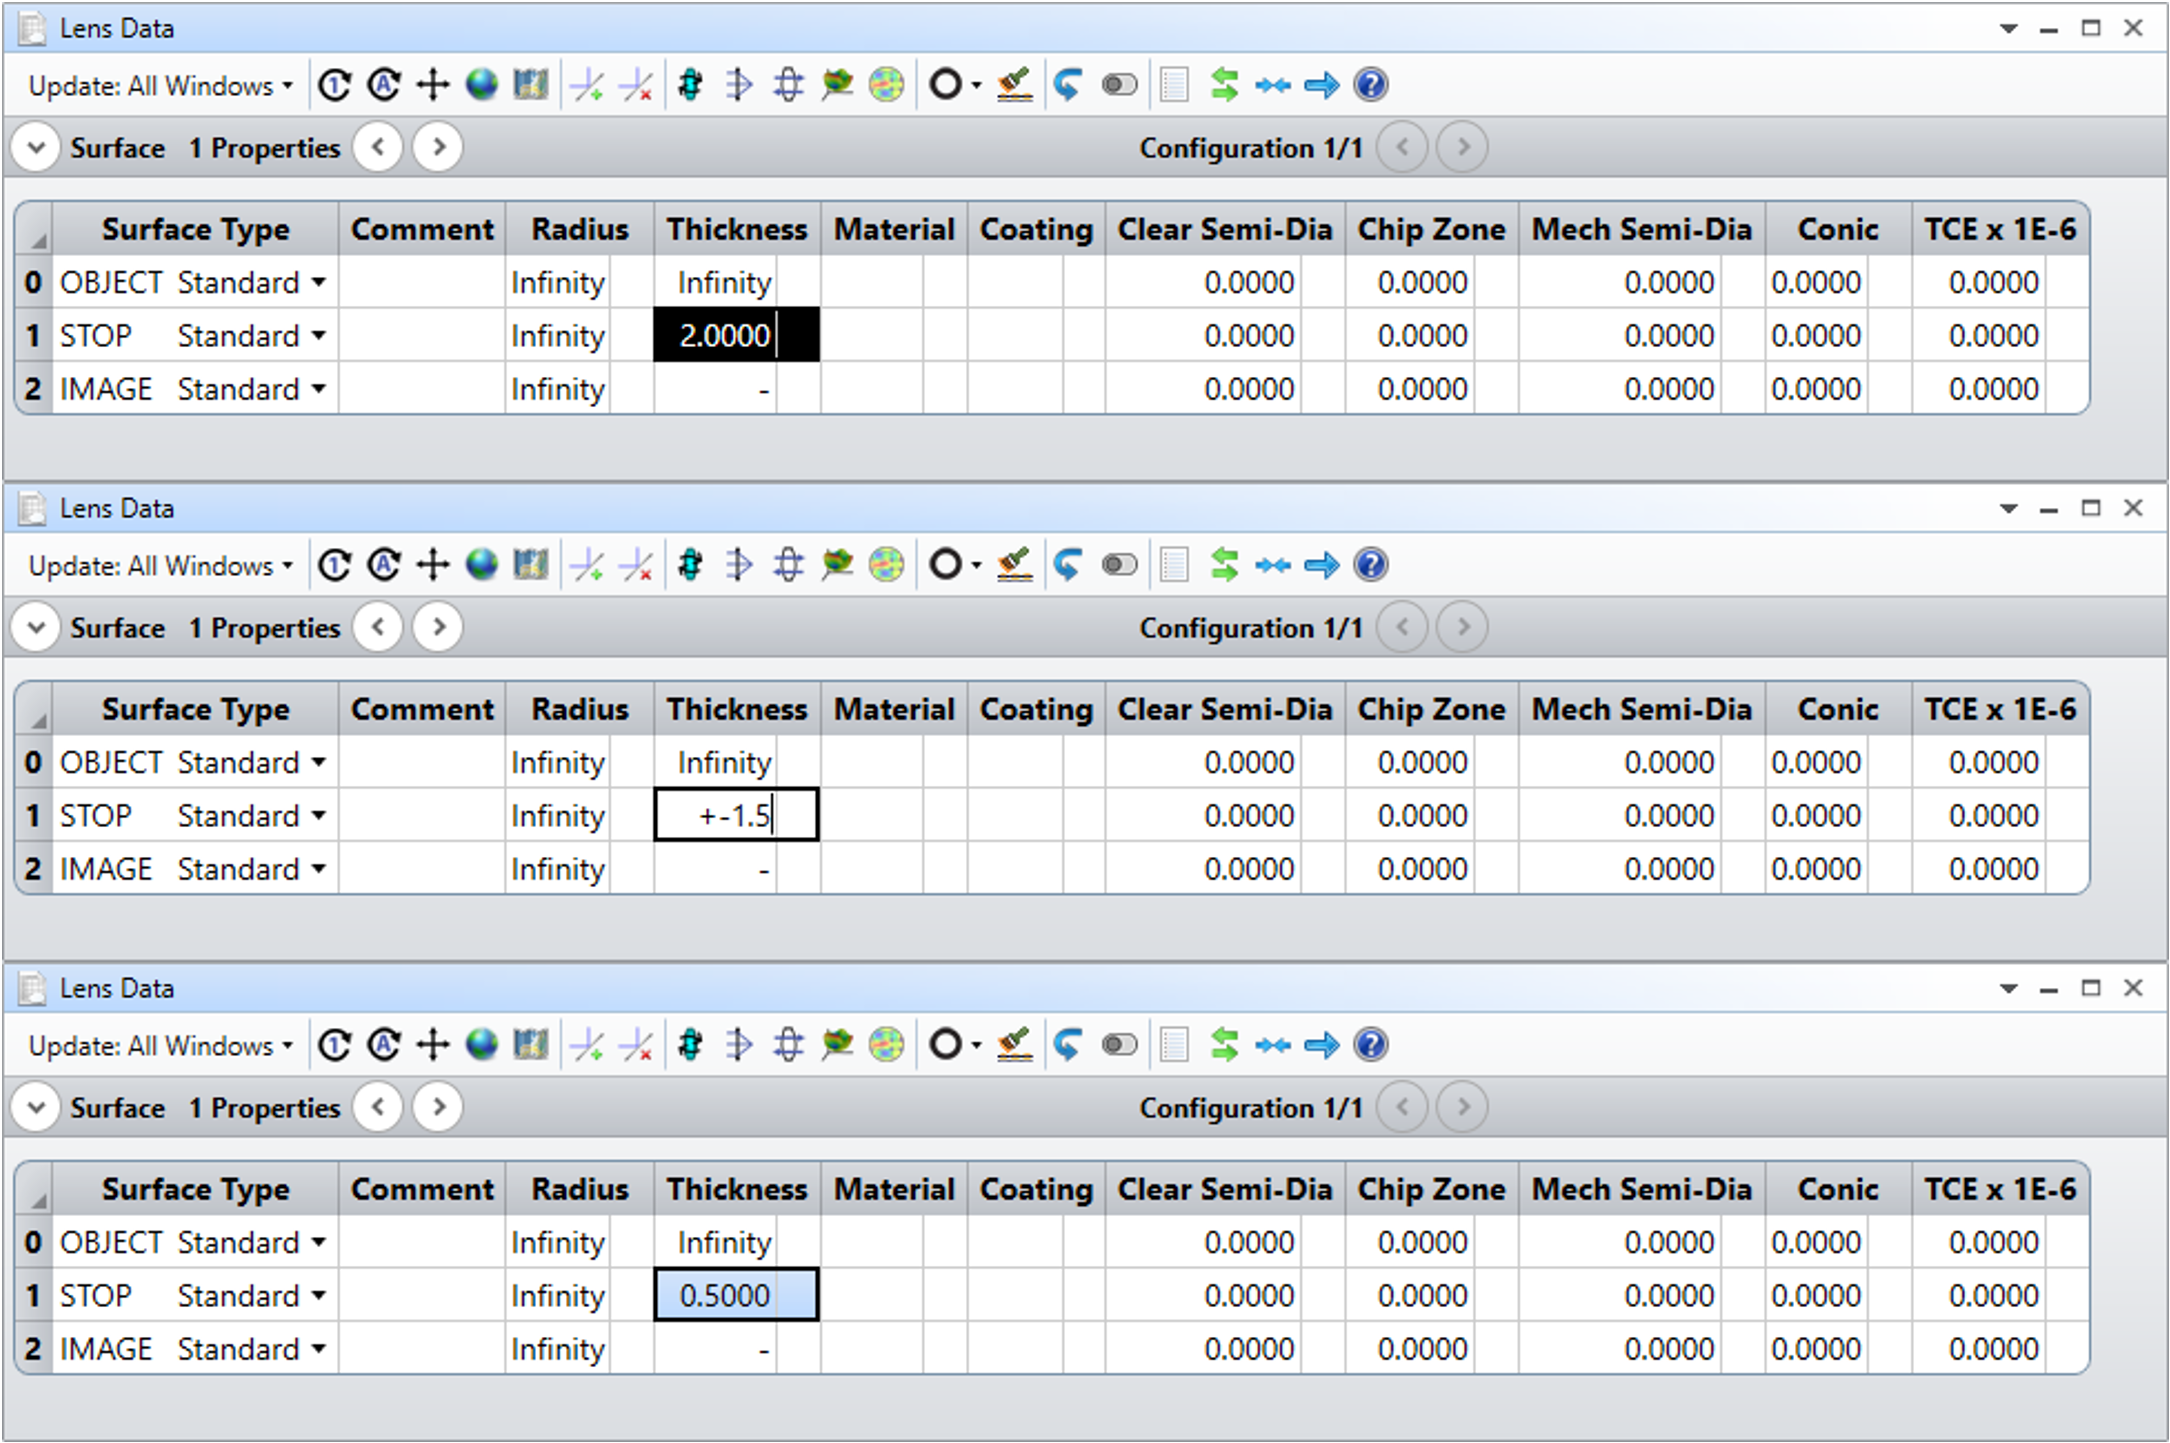
@David.Kappel There are 2 ways you can subtract:

  • Use a plus before the minus +-5
  • Use a space between the minus and the number - 5

Both techniques will subtract 5 from the cell.

(image credit to Erin Elliot)


Forum|alt.badge.img

perform arithmetic operations directly in the cell: works for addition, but not subtraction


Jay.Bernal
  • Monochrome
  • 5 replies
  • February 1, 2024

Hello! Is there a way to temporarily ignore or disable an object in Non-sequential mode? Is there a shortcut key for that?


Sahil
Forum|alt.badge.img+1
  • Visible
  • 22 replies
  • June 23, 2021

Hello  David,

Yeah I did in Non sequential editor. Yeah could be David 

Thanks

David


David.Nguyen
Luminary
Forum|alt.badge.img+2

Hi Sahil,

Thanks for checking, you did it for non-sequential right?

Anyway, I don't mind, maybe its just my installation which is faulty.

The point is rather that its a cool feature to know about :D

Take care,

David


Sahil
Forum|alt.badge.img+1
  • Visible
  • 22 replies
  • June 23, 2021

Hello David,

Thanks Sandrine for letting me in . I have tested in OS build 21.2 and it seems working fine . On clicking on Material column it opens correct material .

Sahil


David.Nguyen
Luminary
Forum|alt.badge.img+2

Thanks for looking into that Sandrine, but just to let you know that it doesn't bother me. It is just something I noticed.

Take care,

David


Forum|alt.badge.img+2

Hi David

I can't seem to be able to reproduce the issue. If I am on the material column, then opening the Materials Catalog opens the right material. I am testing in 21.2 too. I'll ask someone else to have a look. I might be missing something.

Sandrine


David.Nguyen
Luminary
Forum|alt.badge.img+2

Hi Sandrine,

I have setup a non-sequential file with a single Standard Lens object (default parameters) made of N-BK7. If I click the Material cell, and open the Materials Catalog, it goes to AMTIR1 from the AMTIR.AGF catalog. I guess because its the first one in alphabetical order. I'm running the May 24, 2021 version (21.2).

Take care,

David


Forum|alt.badge.img+2

Hi David

It seems to work for me in non-sequential mode too. Would you mind checking again?

Sandrine


David.Nguyen
Luminary
Forum|alt.badge.img+2

Something I just discovered this morning, is that if you click on the Material cell of a surface with a catalog glass, and then open the Libraries..Materials Catalog, it automatically opens at the right page, displaying all the relevant information of that particular glass without having to search for it :)

Saddly, this does not seem to work in non-sequential mode.


yuan.chen
Zemax Staff
Forum|alt.badge.img+3
  • Zemax Staff
  • 276 replies
  • May 18, 2021

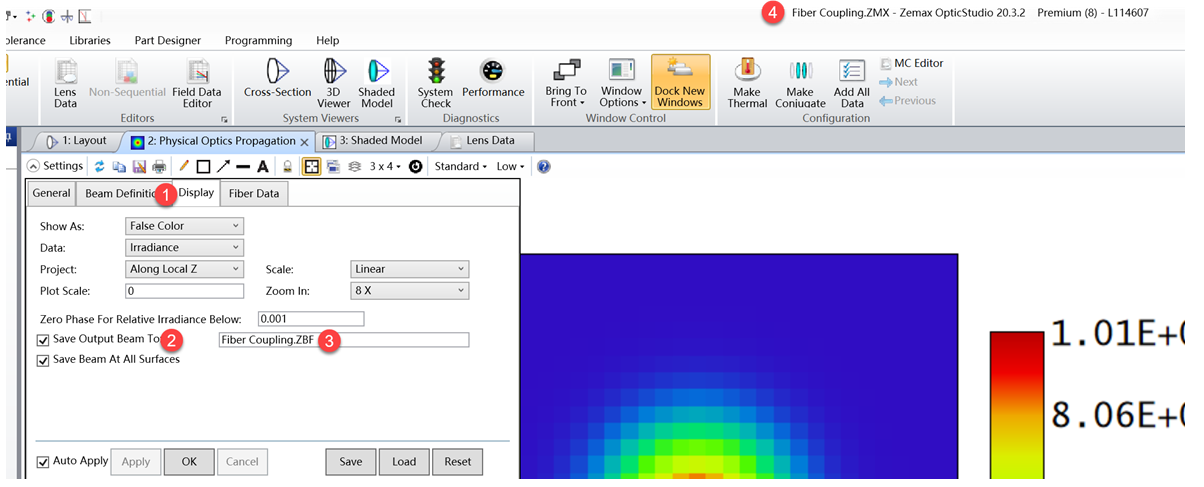
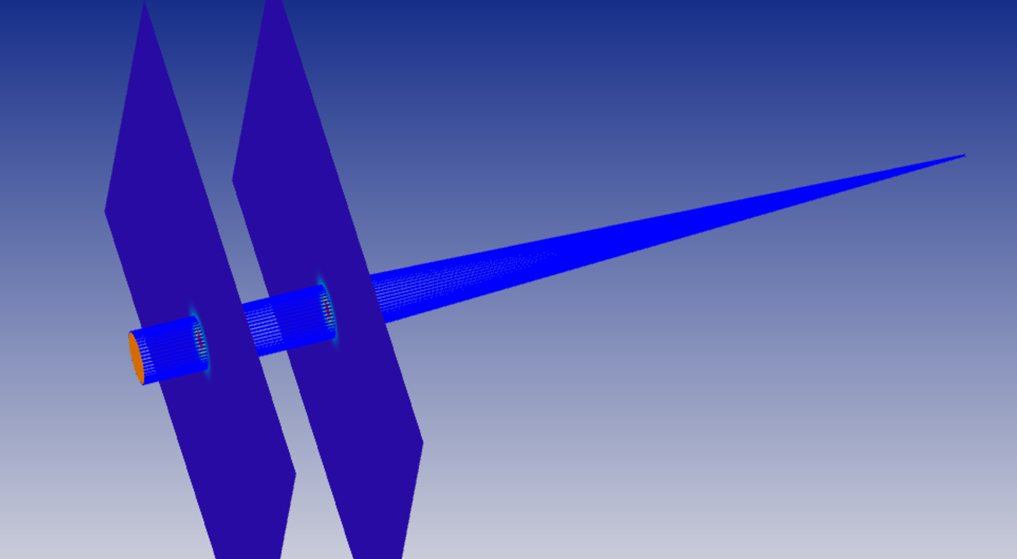
To obtain POP image on shaded view, you can:

  1. Open the POP settings to save the .ZBF file at all surfaces, please make sure that the .zbf file you save has the same name as the .zmx


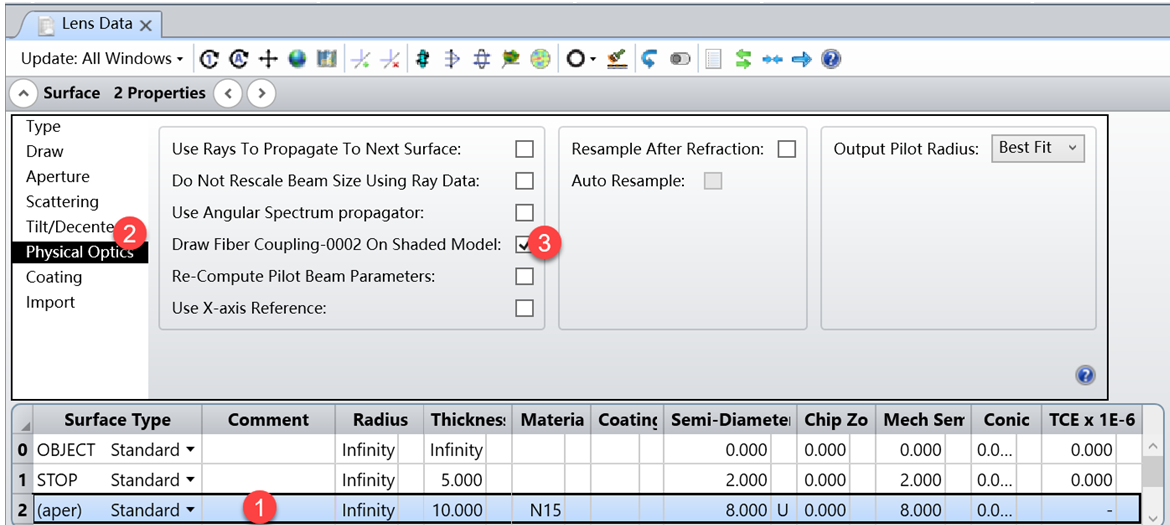
2. Select the surface you want to show, go to the physical optics-> check draw fiber coupling on shaded model

3. Open shaded model plot


yuan.chen
Zemax Staff
Forum|alt.badge.img+3
  • Zemax Staff
  • 276 replies
  • January 22, 2021

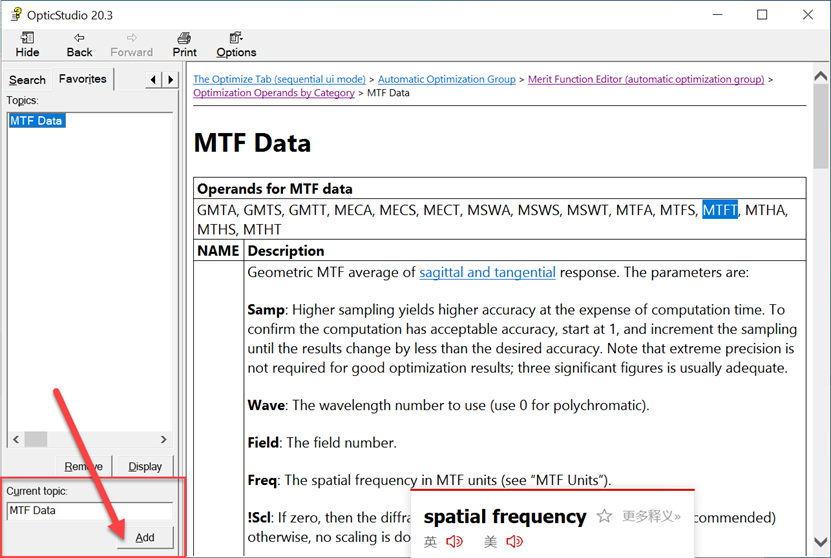
Add your topic to favorites


Forum|alt.badge.img
  • Ultraviolet
  • 67 replies
  • September 30, 2020

Thanks, Angel!

I'll probably use both of these settings!

-- Greg


Angel Morales
En-Lightened
Forum|alt.badge.img+1
  • En-Lightened
  • 203 replies
  • September 30, 2020

Hi there!

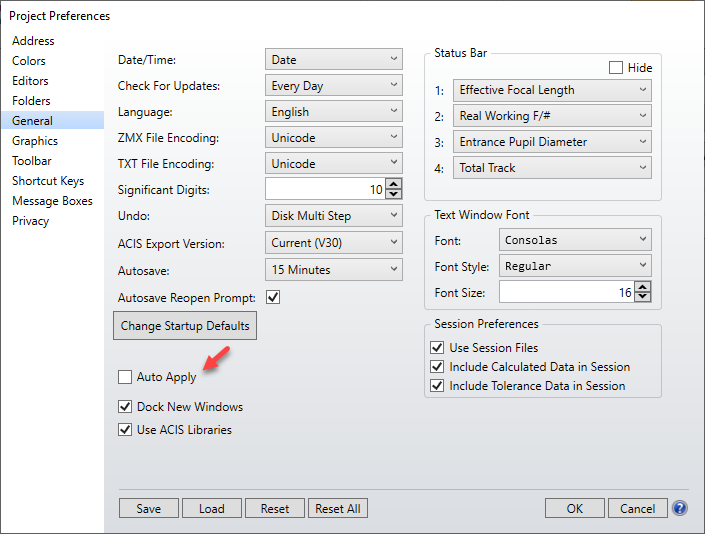
Thanks for your follow-up post here. If you wanted to make Auto Apply be unchecked by default, I believe you can do that in the Project Preferences...General tab:

Let us know if you have any more questions/if I've misunderstood your request here!

~ Angel


Forum|alt.badge.img
  • Ultraviolet
  • 67 replies
  • September 30, 2020

Re: Open the settings before running an analysis: Show Options First

Posted 28 days ago by Sandrine Auriol, Zemax Senior Optical Engineer

'When an analysis takes some time to update, it can be frustrating to wait and especially when the settings are not yours.
But there is a setting in Setup... Project Preferences...Graphics...Show Options First. When it is ticked, the settings box will appear before any analysis graphic or text is computed and displayed.'

I will try this immediately!!  I hate waiting for a long analysis to start running when I re-open a file, and having to remember to try to interrupt it with TERMINATE.  But...

Couldn't you guys just make 'Auto Apply' UNCHECKED be the default condition on opening an analysis??


Thomas Magnac
Zemax Staff
Forum|alt.badge.img+2
  • Zemax Staff
  • 105 replies
  • September 18, 2020

You are right, here they are. 


Alberto.Donazzan
Ultraviolet

Hi Sandrine,

I couldn't find the file 'OpticStudio_new_shortcuts.CFG' inside the zip.


Forum|alt.badge.img+2

Here are Thomas' shortcut keys.


David.Nguyen
Luminary
Forum|alt.badge.img+2
  • Luminary
  • 1140 replies
  • September 14, 2020

To complement what Berta was saying about arithmetic operations in a cell. If you want to subtract a number X from a cell, you should type plus, minus, and then your value X.

+-X

Otherwise, I think it just puts the value minus X into the cell.


Angel Morales
En-Lightened
Forum|alt.badge.img+1
  • En-Lightened
  • 203 replies
  • September 8, 2020

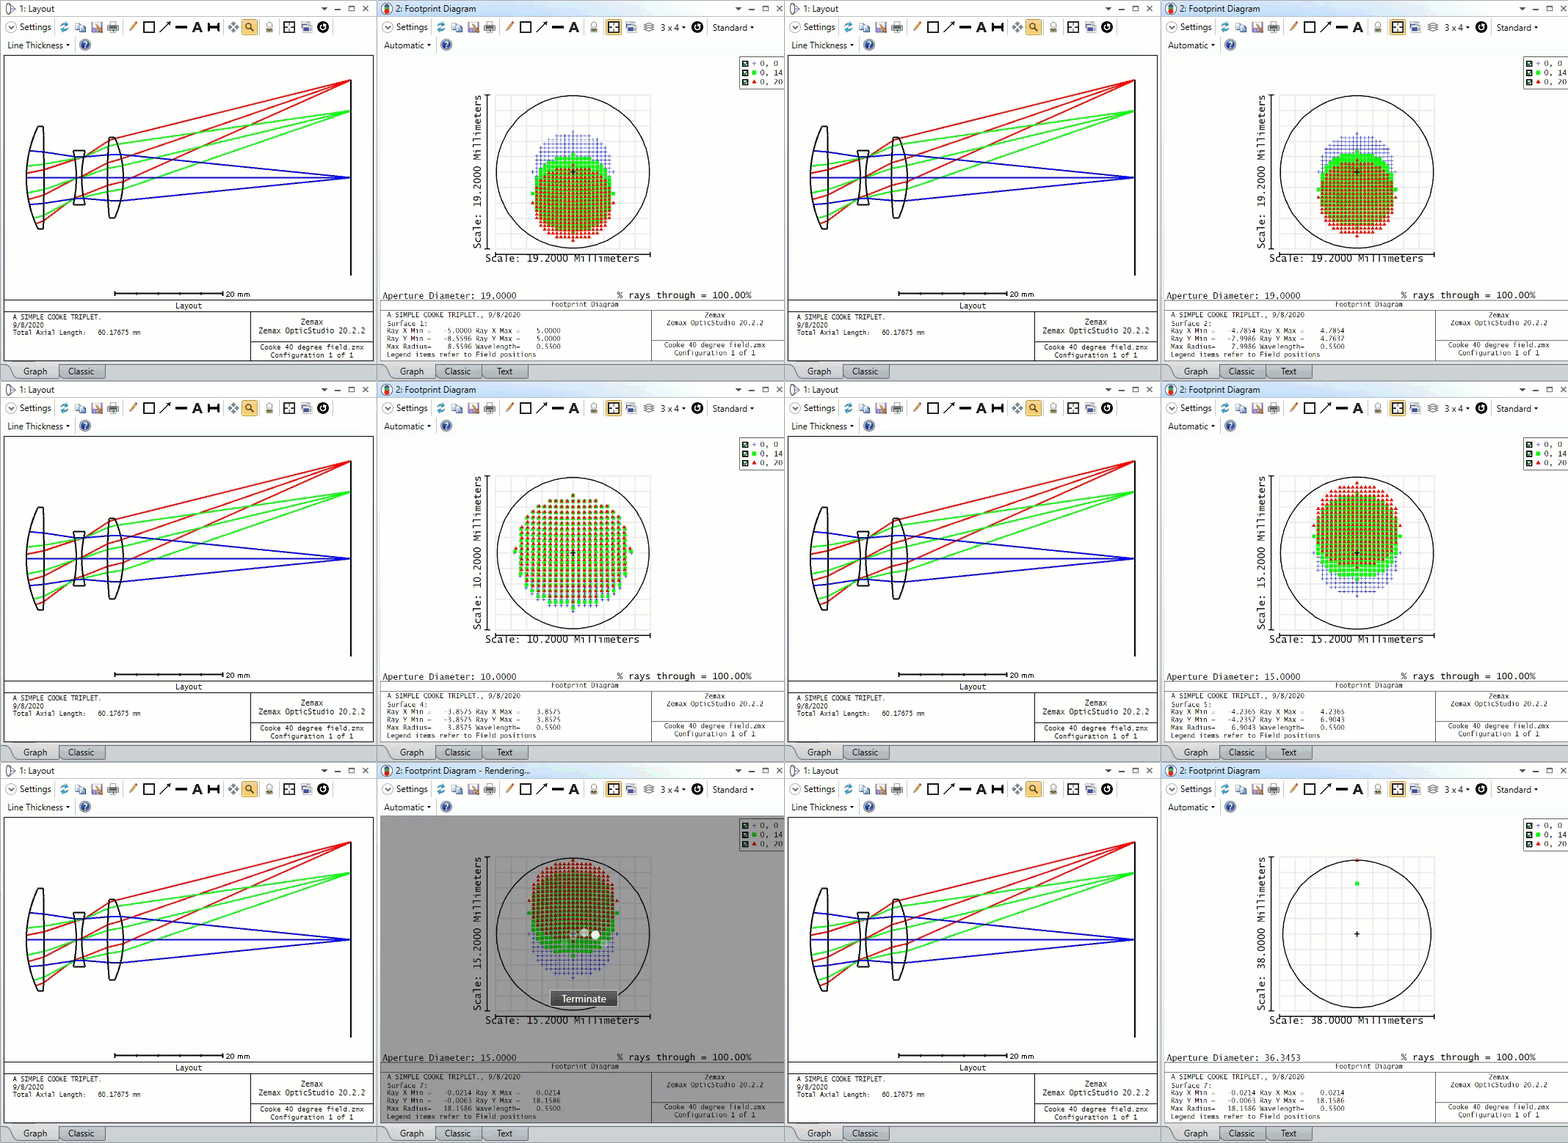
Another neat thing to keep in mind is that some analyses support the use of the left/right arrow keys when looking at a surface-specific result. For example, we can use the right arrow key to scroll through different surfaces in the Footprint Diagram:

Another analysis that uses this is the Beam File Viewer. Very handy when you want to check the rays/beam at different surfaces relatively quickly!

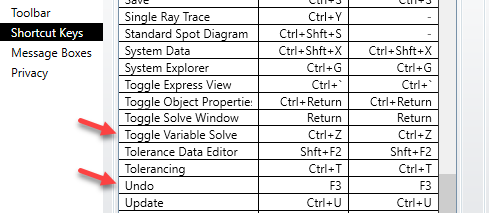
And David, you might have seen this already, but you can tweak existing shortcuts in the Project Preferences:

Though, we don't have anything in OpticStudio to re-program yourself 😄

~ Angel


Chris Normanshire
Zemax Staff
Forum|alt.badge.img+2

Apologies David. Copy is indeed ctrl+c and paste is ctrl+v. Thanks for pointing that out. I've corrected my post. 


David
Luminary
Forum|alt.badge.img+4
  • Luminary
  • 337 replies
  • September 7, 2020

Thanks, Chris. But on my computer, ctrl+c is copy and ctrl+v is paste. Which is good because it's pretty much industry standard. Now if only I could get ctrl+z back as undo. Although I've been using it for variable for nearly 20 years, so it might be too late to reprogram myself.  ;-)


Chris Normanshire
Zemax Staff
Forum|alt.badge.img+2

Don't forget copy/paste!

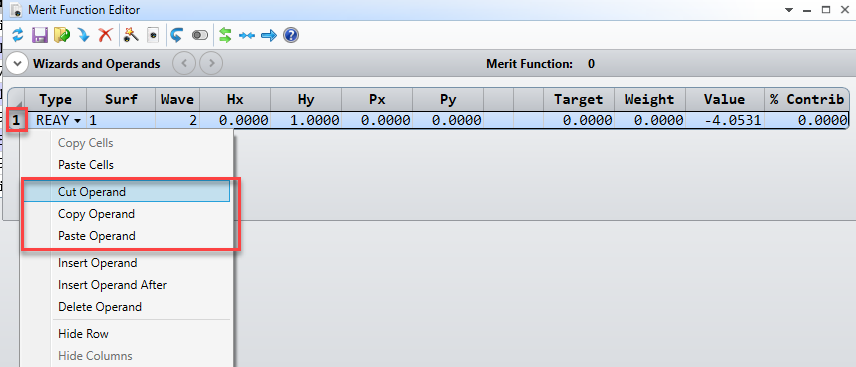
The editors in OpticStudio are essentially spreadsheets, so if you need to enter multiple similar rows into an editor then using standard copy/paste functionality can be a real time saver.

For example, if you'd like to calculate the chief ray height at multiple surfaces in the MFE then you can simply set up the required operand for a single surface.

Then copy and paste multiple instances.

Then all that is needed is to modify the surface number on each line.

For added speed this is best done by using th ctrl+c (copy) and ctrl+v (paste) keyboard shortcut, although it is also possible with the mouse by left-clicking the row number to highlights and then right-clicking the row number to bring up the context menu.

The attached video shows the whole process. This technique will work in all OpticStudio editors. It will also work with blocks of operands/rows, so in the example above you could initially setup lines for both the chief and marginal rays height and copy/paste simultaneously.


Reply


Cookie policy

We use cookies to enhance and personalize your experience. If you accept you agree to our full cookie policy. Learn more about our cookies.

 
Cookie settings