How do I optimize collimation based on physical optics propagation?
I have a beam reducer consisting of stock lenses from Thor with the hope of reducing an input beam of D=4mm to D_out=0.5mm. I have run the optimization wizard already, based on “Angular Image quality” at the image surface, and the system looks good, and my beam is collimated. However the physical optics propagation has has by beam width at ~20mm. Is there a way to collimate based on physical optics propagation? Thank you so much for any advice!
Best answer by Michael.Young
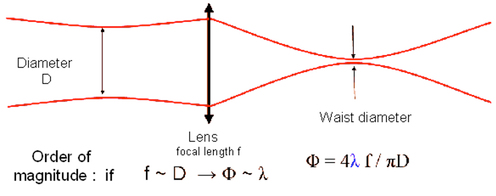
Collimation of Gaussian beam is relative, meaning that there is no perfectly collimated beam. You can say what the beam waist is, where it is, and what the Rayleigh range or confocal parameter is. Outside of this, the beam naturally converges or diverges. Collimation may mean that you have a very long confocal parameter; however, there will still be a waist as shown here,
Example of relaying a Gaussian beam
What this means is that if you want a collimated quality to the beam over a long range, then you have to increase the “f/no” of the beam. If you want a very small diameter and collimated beam, it will only be collimated over a very short range. This leads back to what @tariq.islam was saying about measuring the beam width on either side of the waist and trying to balance the beam size between these two points. This doesn’t guarantee collimation but rather it gives you a measure of the beam size around the waist and what you confocal parameter looks like. This can also be done with the Paraxial Gaussian beam operands (which are considerably faster).
Here is some background on beam propagation from Zemax and Edmund Optics. Zemax also demonstrates here how the geometric ray tracing is a good approximation.
Here is where Zemax explains how to use the Paraxial Gaussian beam operands. I would recommend this as most of the time this is adequate and using POP is not necessary (slow or provides no additional benefit).
Finally, here is where Zemax explains the POPD operand and how to use it for optimization.
POP is useful for modelling diffraction behavior like the Spot of Arago. This is a fun check that you understand the POP settings.
All POP (Physical Optics Propagation) data can be utilized in the merit function editor using the operand POPD. Before you can use this data, make sure to save the settings of your POP analysis.
While there isn’t a direct POPD operand for verifying collimation, you can achieve this by implementing the following workaround to approximate real-world measurements:
Evaluate Beam Width at Multiple Surfaces:
Use the POPD data for beam width at different surfaces (e.g., POPD 23 and POPD 24) to assess the beam’s width at two surfaces that are separated by a specified distance. Detailed instructions and an example on how to do this can be found here: What is the size of my POP beam? – Knowledgebase (zemax.com)
Optimize Beam Width Consistency:
Adjust the system’s parameters so that the beam width at both surfaces is as close as possible. This can be achieved using the DIFF operand in the merit function editor to minimize the difference in beam widths at these surfaces.
By following this approach, you can optimize the collimation of your system based on physical optics propagation data.
Collimation of Gaussian beam is relative, meaning that there is no perfectly collimated beam. You can say what the beam waist is, where it is, and what the Rayleigh range or confocal parameter is. Outside of this, the beam naturally converges or diverges. Collimation may mean that you have a very long confocal parameter; however, there will still be a waist as shown here,
Example of relaying a Gaussian beam
What this means is that if you want a collimated quality to the beam over a long range, then you have to increase the “f/no” of the beam. If you want a very small diameter and collimated beam, it will only be collimated over a very short range. This leads back to what @tariq.islam was saying about measuring the beam width on either side of the waist and trying to balance the beam size between these two points. This doesn’t guarantee collimation but rather it gives you a measure of the beam size around the waist and what you confocal parameter looks like. This can also be done with the Paraxial Gaussian beam operands (which are considerably faster).
Here is some background on beam propagation from Zemax and Edmund Optics. Zemax also demonstrates here how the geometric ray tracing is a good approximation.
Here is where Zemax explains how to use the Paraxial Gaussian beam operands. I would recommend this as most of the time this is adequate and using POP is not necessary (slow or provides no additional benefit).
Finally, here is where Zemax explains the POPD operand and how to use it for optimization.
POP is useful for modelling diffraction behavior like the Spot of Arago. This is a fun check that you understand the POP settings.