How do I save detector output in nonsequential mode from 30 different detectors. They are listed in series in the NSC editor from 5-30.  I would like to save the text full pixel output of the files as d0.txt thru d29 by changing the detector viewer from detector 5-35 detector element in the NSC editor.


-----------------------


!code attempt 1


!A$= $d0.txt #or


A$= "d0.txt"  


GETTEXTFILE A$, DVW_DETECTOR, 5 #outputs detector 5 to text file


A$= "d1.txt" 


GETTEXTFILE A$, DVW_DETECTOR, 6


...


-----------------------------


!code attempt 2


!Incorporating for loop:


DETECTORSTART=5


DETECTOREND=36


TXTFILESTART=0


TXTFILEEND=30


!A$= $d0.txt() 


DETECTORCOUNT=DETECTORSTART


FOR i, TXTFILESTART, TXTFILEEND, 1


A$= "d" +  i + ".txt"


GETTEXTFILE A$, DVW_DETECTOR, DETECTORCOUNT #outputs detector to text file


DETECTORCOUNT = DETECTORCOUNT +1


NEXT


-----------------------------


Do I need to use MODIFYSETTINGS SETTINGFILENAME, TYPE, VALUE to change detectorviewer detector?


Such as MODIFYSETTINGS SETTINGFILE$, DVW_DETECTOR, DETECTORCOUNT ?
Hey Jeff,


I'd use the SAVEDETECTOR keyword. Syntax is just 
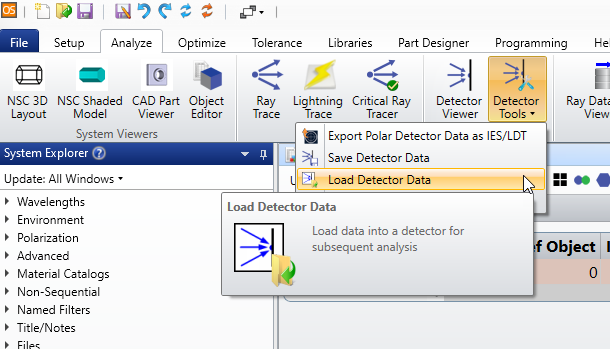


SAVEDETECTOR surf, object, filename


You can then use the files with LOADDETECTOR and the UI features:


Thanks for the reply Mark!


I try to run this macro line as a test:


MODIFYSETTINGS 'f.cfg', LAY_RAYS, 100   


and I get the error:


ERROR in MODIFYSETTINGS: Incorrect version number in settings file.


I need to output the txt file for an external program to analyze it. What I'm really trying to do is change the detector number from 5 to 6 with this command, but get the same error:


#MODIFYSETTINGS 'f.cfg', DVW_DETECTOR, 6   


The following command worked to output the txt file 


GETTEXTFILE 'd.txt', DVR, , 0


If the MODIFYSETTINGS command doesn't work, I will try the API next or just crudely an external macro program.


Hello Jeffrey,


Each analysis feature and graphic window has its own settings.  We may change them as we desire, and also change the defaults so that the next time we open the same analysis feature, a certain combination of saved settings is used.  Sometimes, it is desirable to observe how the results of an analysis change as a function of a setting.  This may be done manually, or we can automate the process via the keyword MODIFYSETTINGS in the Zemax Programming Language (ZPL). However, it is important to understand that this keyword does not make direct changes to the settings of an open analysis window.  Instead, MODIFYSETTINGS makes changes to the settings files, also known as the configuration (.CFG) files.


In order to make changes, you should follow the procedure below:


  1. First open your lens file and open a Detector Viewer. 


  2. In the settings, please click the “Reset” button (in case you have previously saved settings which are not the OpticStudio defaults).


  3. Then please save the settings by clicking the “Save” button. When the “Save” button is chosen, OpticStudio creates a configuration file with the lens file name but with .CFG extension as well as a configuration file specific to the chosen analysis feature (for the detector viewer, this file is called DVR.CFG, while for the 2D Layout it is LAY.CFG). These .CFG files exists within the main Zemax\Configs directory, while the lens specific configuration file is saved in the same path as the currently opened lens file.


When changing the settings within the macro language, you must modify the analysis-specific configuration file, in case of the detector viewer the DVR.CFG, in case of the 2D Layout the LAY.CFG, and not the lens configuration file.


Please note, that in order to ensure that the analysis-specific configuration files located in the main Zemax directory are not perturbed, you may copy and paste the necessary configuration files into a temporary folder, and then use these files in the macro. You may of course also choose to modify the configuration files located in the main Zemax directory with the macro.


So to sum up, in your code you should modify the DVR.CFG file to set up the desired settings for the detector viewer:


configfile$ = 'DVR.CFG'


settingsfilename$ = FileNameStringsBase$ + configfile$


More specifically, in order to specify the number of the detector used you should use the following line:


MODIFYSETTINGS settingsfilename$, DVW_DETECTOR, detector_num


For further information, you may find a list of 3 character string code arguments in the Help file under  The Programming Tab > String Codes


I hope this helps! 


Please let us know if you have any further questions!


Reply