
API support for the Cross-Section, 3D Layout, and Shaded Models is added to the OpticStudio API. The support allow users to change the settings via the API and retrieve a static image. Layouts in both sequential and non-sequential mode are supported. Some toolbar buttons, such as automatically setting camera viewpoints, will also be accessible via the API.
Please download the following Python Standalone codes, including:
- PythonStandaloneApplication_SEQ_layout.py (sequential mode and export 2D cross-section)
- TheSystem.Tools.OpenCrossSectionExport() # the core command
- PythonStandaloneApplication_SEQ_3DViewer.py (sequential mode and export 3D viewer)
- TheSystem.Tools.Open3DViewerExport()
- PythonStandaloneApplication_SEQ_ShadedModel.py (sequential mode and export shaded model)
- TheSystem.Tools.OpenShadedModelExport()
- PythonStandaloneApplication_NSC_3D.py (non-sequential mode and export 3D layout)
- TheSystem.Tools.OpenNSC3DLayoutExport()
- PythonStandaloneApplication_NSC_ShadedModel.py (non-sequential mode and export shaded model)
- TheSystem.Tools.OpenNSCShadedModelExport()
Let us use 2D cross-section image export as one example: here is the setting window of cross-section layout.
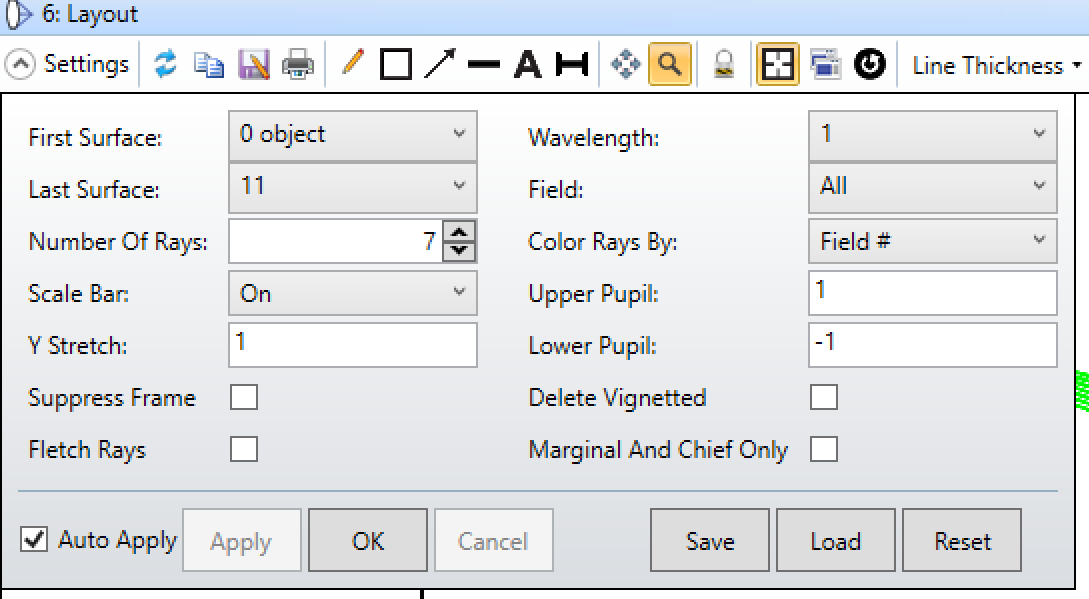
Now you can use API to access these settings:
TheSystem = TheApplication.PrimarySystem
TheSystem.LoadFile(r"C:\Users\test\Double Gauss 28 degree field\Double Gauss 28 degree field.zmx", False) #load the targeted OS file
Left panel of settings window
myLayout = TheSystem.Tools.Layouts.OpenCrossSectionExport()
myLayout.StartSurface = 1
myLayout.EndSurface = TheSystem.LDE.NumberOfSurfaces - 1
myLayout.NumberOfRays = 7
myLayout.YStretch = 1
myLayout.FletchRays = False # or True
Right panel of settings window
myLayout.Wavelength = -1 # Note that -1 means all wavelength !!!
myLayout.Field = -1 # Note that -1 means all fields
# myLayout.ColorRaysBy = ZOSAPI.Tools.Layouts.ColorRaysByCrossSectionOptions.Fields # choice 1
# myLayout.ColorRaysBy = ZOSAPI.Tools.Layouts.ColorRaysByCrossSectionOptions.Waves # choice 2
myLayout.ColorRaysBy = ZOSAPI.Tools.Layouts.ColorRaysByCrossSectionOptions.Wavelength # choice 3
myLayout.UpperPupil = 1
myLayout.LowerPupil = -1
myLayout.DeleteVignetted = False # or True
myLayout.MarginalAndChiefRayOnly = False # or True
myLayout.SaveImageAsFile = True # or False (if you do not want to save the image)
myLayout.OutputFileName = r"C:\Users\test\Double Gauss 28 degree field_CS_5.jpeg" # supported image format including jpeg, bmp, png. # You select the path to save the exported image
myLayout.OutputPixelWidth = 1920 # 4096 and even bigger
myLayout.OutputPixelHeight = 1080 # 2400 and even bigger
Besides, the toolbar of Line Thickness is also supported:
# myLayout.SurfaceLineThickness = ZOSAPI.Tools.Layouts.LineThicknessOptions.Thinnest
# myLayout.SurfaceLineThickness = ZOSAPI.Tools.Layouts.LineThicknessOptions.Thin
myLayout.SurfaceLineThickness = ZOSAPI.Tools.Layouts.LineThicknessOptions.Standard
# myLayout.SurfaceLineThickness = ZOSAPI.Tools.Layouts.LineThicknessOptions.Thick
# myLayout.SurfaceLineThickness = ZOSAPI.Tools.Layouts.LineThicknessOptions.Thickest
# myLayout.RaysLineThickness = ZOSAPI.Tools.Layouts.LineThicknessOptions.Thinnest
# myLayout.RaysLineThickness = ZOSAPI.Tools.Layouts.LineThicknessOptions.Thin
myLayout.RaysLineThickness = ZOSAPI.Tools.Layouts.LineThicknessOptions.Standard
# myLayout.RaysLineThickness = ZOSAPI.Tools.Layouts.LineThicknessOptions.Thick
# myLayout.RaysLineThickness = ZOSAPI.Tools.Layouts.LineThicknessOptions.Thickest
Last but not least, the direct access of the R, G, and B data of exported image is supported also. For example, you could uncomment the following piece of code to obtain these data (i.e., rData, gData, bData). Note that you need to let myLayout.SaveImageAsFile = False
# if (myLayout.RunAndWaitForCompletion()):
# ImageExportData = myLayout.ImageExportData
# if ImageExportData is not None:
# pixel = ImageExportData.GetImagePixel(512, 512)
# print(f"Pixel 512x512: {pixel.R} {pixel.G} {pixel.B}")
# rData = [0] * (1920 * 1080)
# gData = [0] * (1920 * 1080)
# bData = [0] * (1920 * 1080)
# ImageExportData.FillValues(1920 * 1080, rData, gData, bData)
# pixels = ImageExportData.Values
# print(pixels[512, 512].ToString())
Hope you like this new object Layout under the Tools! Please feel free to modify the attached codes as you want, and please let us know if you have any questions.