[Webinar] Modeling Flash Lidar in OpticStudio, Part 1: Lidar Component Setup in Sequential Mode [Q&A]


Userlevel 5
Badge +1

This thread is dedicated to the upcoming webinar: Modeling Flash Lidar in OpticStudio, Part 1: Lidar Component Setup in Sequential Mode. Any questions received during the webinar will be responded to as a reply on this thread. Feel free to post your own questions! The speaker will be notified and will respond as long as the thread is still open.

Be sure to subscribe to this thread if you want to see additional discussion regarding this webinar topic. The thread will be open to new replies through Friday, August 12th.


This event is closed. 

Click here to watch the recording.

Click here to see part 2.


Webinar details

Date: Thursday, August 4th

Time: 6:00 - 6:45 AM PDT | 11:00 - 11:45 AM PDT

Presenter: Angel Morales, Senior Application Engineer at Ansys Zemax

Abstract:

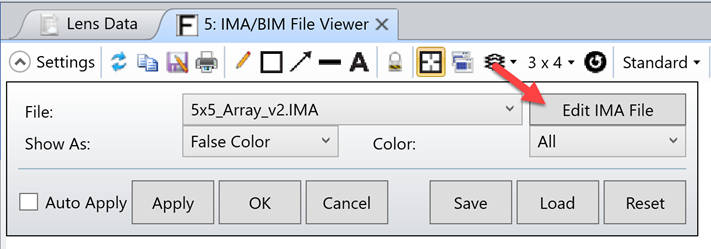
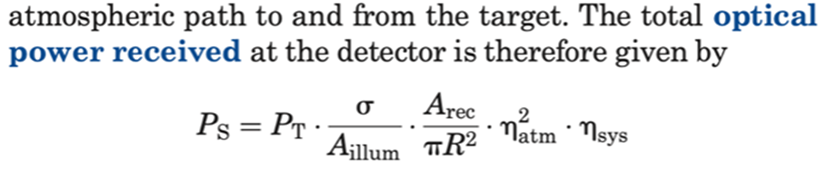
In the consumer electronics space, engineers leverage lidar for several functions, such as facial recognition and 3D mapping. While vastly different embodiments of lidar systems exist, a flash lidar solution generates an array of detectable points across a target scene using solid-state optical elements. This technology enables compact packaging, and it has allowed detailed spatial data acquisition to be more commonplace in consumer products, like smart phones and tablets. In part one of this webinar series, we will explore how to use OpticStudio’s Sequential Mode to setup and characterize the transmitting and receiving modules of a flash lidar system.


This topic is closed to new comments

11 replies

Userlevel 5
Badge +1

Hi everyone,

Thanks again for attending our webinar earlier this month!

We have collected some questions we did not have time to address during the presentation and will be sharing them below. If you have any further questions, feel free to add them to this thread! Thanks all.

Userlevel 5
Badge +1

Q: Where can we get the FlashLidar_Transmit_Start.zos file?

A: Please find it (and the other files used in this webinar) attached to this post! Also, this webinar series was based on our articles of the same name. You can find a slightly different version of these files in that article series, as I made some modifications for the webinar: Modeling a Flash Lidar System - Part 1

Userlevel 5
Badge +1

@Mikayel.Musheghyan

Q: Hey Angel! Why would one use the geometric image analysis and not the image simulation? Is it only because geometric supports configuration selection "all"?

A: Hi Mikayel! You are correct. I was interested in leveraging the multi-configuration overlap result, so that I could superimpose the different diffraction orders of an input source array into a single output.

There is also a bit of computational difference in the two analyses – GIA is strictly ray-tracing, whereas Image Simulation will take an array of Point Spread Functions within the defined field of view. IS then convolves the input image based on the PSF Array (and interpolates PSF performance for any non-sampled portions of the field of view). Since the input image was effectively a series of point sources, and the system would be mostly affected by geometric aberrations, I decided to use GIA as it was a good modeling of performance, and you also get the benefit of “stacking” the different configurations in one output.

Userlevel 5
Badge +1

Q: all aspherical lens in the receiver?! Though! / Could you share the model files?

A: Haha, yes, it is definitely a nice lens! I should shout out @Katsumoto Ikeda for providing the lens in most of its current state -- I did a bit of editing afterwards for the articles/webinar.

Please see above for the full Part 1 attachments!

Userlevel 5
Badge +1

@Phuong.do

Q: How was the 5x5 array image defined/generated? Will the presentation and Zemax sample files be available for download?

A: The 5x5 array image for the Geometric Image Analysis was made in the GUI text editor for IMA files, which you can get to via Analyze tab…Extended Scene Analysis…IMA and BIM File Viewer. In that window, you can click “Edit IMA File”:

It’s a 537x537 array with single pixel emission sources in a 5x5 array, spaced equally through the full array. I used a ZPL macro to help write a bit of the code, but it was a bit of a rough draft code, and I did some final tweaking by hand in the GUI. The IMA file should be present with the attached .ZAR, though.

Lastly, we don’t share the slides themselves, but the recording and files can be found above!

Userlevel 5
Badge +1

@Donald.Fisher

Q: What is the practical limit to the range or distance of this lidar?

A: Thanks for the question! For this lidar system, we were imaging a specific use case (some kind of augmented reality system in a headset or small electronic device aiming at a desk or table). That was captured in the specifications we discussed, like the field of view.

We hadn’t considered the power of the source itself, though, which to my understanding is a critical piece for assessing the range of the lidar. We also assumed some ideal transmission through the Tx/Rx optics for sake of demonstration and didn’t account for the sensitivity of the receiver, which would inform the range this lidar would work within. I did refer a bit to the SPIE Field Guide to Lidar by Paul McManamon, which relates lidar range (R in the below equation) with power received at the detector (Ps):

Properties like the area of object or receiver illumination, transmittance of the atmosphere and optical system, and cross section (σ, which would be the ratio of incident light area over scattering object area in the scene, times its reflectance) would impact the power on the sensor, and therefore tell us if the return signal is high enough for the sensor to respond to. Again, we hadn’t taken this treatment for the system in question, but perhaps it is something we could look at for future resources!

Userlevel 5
Badge +1

Q: how do you simulate a diffraction grating? please send the slides when finished as last webinar this was not sent Thank you!

A: The Diffraction Grating surface used in this webinar is a native surface type in OpticStudio. It’s an idealized model of a linear grating that alters the phase of rays incident on the surface to perform ray bending. So, we’re not really modeling the microstructure that generates the diffraction with this surface type – just the net effect on the rays themselves. For more information, you can refer to this forum post: How diffraction ray-tracing is calculated.

As for the slides, please refer back to the recording and attachments. Thanks!

Userlevel 5
Badge +1

@Bilyboy

Q: What kind of detector does Lidar use? What is the time response of the detector? / Are these example available on Zemax community for our practice?

A: Due to the ranges that lidar systems can be used at, the requirement to remain eye safe at the wavelengths used, as well as the low power in reflection from the scene, typically very sensitive detectors like avalanche photodiodes are used to leverage the high gain of the sensor. I think the time response required of the detector depends on application/lidar implementation as well, but for some reference, here is a product page for a lidar sensor with a response rate of 500 MHz: Si PIN photodiode S13773 | Hamamatsu Photonics

Additionally, I came across the following two resource that expand very nicely on detectors used with flash lidar:

Userlevel 5
Badge +1

Q: can I measure the intensity per order? If Yes, how to do it?

A: Thanks for your question! You can measure the intensity of each order with an analysis like Geometric Image Analysis. It is able to report transmitted power through the selected evaluation surface as a ratio of your specified input power, and you can optimize on this quantity with an operand like IMAE. It can account for things like coating effects as well if you have polarization turned on.

We have an article that uses this operand, but the use case is specific to a multi-mode fiber coupling system. The main difference would just be not specifying an image plane NA (as this would be how GIA filters out rays that don’t couple into the multi-mode fiber): How to model multi-mode fiber coupling

Lastly, I should note that the native Diffraction Grating surfaces do not model efficiency in diffraction orders. You would need to know that beforehand, either with measured data or simulated in some other software, such as Lumerical. You could then apply a coating that provides the effective transmission of the diffraction grating per order and use GIA as discussed above.

Userlevel 5
Badge +1

@Kate.Whittaker

Q: I was wondering why he used such a small array of point sources in your .ima file compared to the total number of pixels?

A: The size of the pixels in the 5x5 Array IMA file was set to just make each “active” pixel an effective point source at the Object plane. With a lower resolution, each pixel would start to become more of an extended source, and I wanted a better comparison between this sequential setup to the NSC setup that gets explored in Part 2 (which is also modeling the input as an array of point sources).

To find a rough pixel size, I flipped the Tx system around to find the size of the geometric spot of a collimated input beam where the Image Space NA was roughly the same as the original source NA. With that in mind, and knowing that the IMA file array would need to be sized at a 1.28mm x 1.28mm emission area, I tried to find a good balance of full pixel resolution that would retain the point source emission in that IMA, i.e., where the emission pixel size of the IMA when stretched to the emission area size still acts like an effective point source.

Userlevel 4
Badge

Q: all aspherical lens in the receiver?! Though! / Could you share the model files?

A: Haha, yes, it is definitely a nice lens! I should shout out @Katsumoto Ikeda for providing the lens in most of its current state -- I did a bit of editing afterwards for the articles/webinar.

Please see above for the full Part 1 attachments!

All plastic lenses :) That took a bit of tinkering to accomplish, but if you look at the aspherical terms, they are relatively tame. Sometimes it is hard to keep the aspherical terms under control, so but I consider this lens manufacturable for an aspherical lens set.