Feature Experiment Feedback: Ray Aiming Wizard


Userlevel 3
Badge

In OpticStudio 22.1, we have improved the performance of our ray aiming algorithm for innovative applications that require a wide field-of-view (such as machine vision, surveillance cameras on drones, autonomous vehicles as well as cell phone lenses). Significant improvements have been made to address issues such as “cannot trace” errors and discontinuities in analyses that can occur when using ray aiming. These improvements are referred to as Enhanced Ray Aiming, and with the 22.1 release, we are first supporting rotationally symmetric wide field-of-view systems.

The OpticStudio 22.1 release also features one exciting new Feature Experiment, called the Ray Aiming Wizard. This tool provides the necessary data for you to determine the optimal ray-aiming settings for your system, including the new Enhanced Ray Aiming method. With the new Ray Aiming Wizard, you will know when and how to use ray aiming to get accurate system analysis and modeling. You can find this tool in the Ray Aiming section of the System Explorer in sequential mode. To enable this Feature Experiment, select Help...Feature Experiments...Ray Aiming Wizard

Enabling the Ray Aiming Wizard in the Feature Experiments

We are seeking your feedback on these features. If you use this feature, comment below with your thoughts. 

Submit your feedback in Chinese: 新功能体验: OpticStudio 22.1

Submit your feedback in Japanese: 新機能の試行: OpticStudio 22.1


11 replies

Userlevel 7
Badge +3

Hi Tom,

I’ve used the new ray-aiming algorithms long enough to have a view on this.

First, as I’ve said before, I think you guys have knocked it out of the park with the updates to ray aiming. The recent changes have really strengthened OS in this area, and anyone using older versions of the software to design wide-angle lenses is keeping one arm tied behind their back. Anyone doing wide angle design should be on the current, or at least very recent, version of OS.

Next, I really don’t have much use for the Ray-Aiming Wizard. I can see how it works, by turning various features on and off and monitoring the pupil aberration, but you can easily do that by hand if needed. Instead, I suggest a simple algorithm

IF (there is power between the OBJECT and STOP surfaces) THEN turn paraxial ray-aiming ON.

You could move all the old soldiers in the Ray-Aiming tab of the System Explorer to the ‘Advanced’ tab, or better to a ‘Deprecated’ tab, so that any corner-cases that emerge can still be addressed.

The mindset of the ‘ray-aiming’ tab is rooted back in the 286 processor days of Zemax development. When memory was measured in kilobytes and CPU speed in MHz, it was necessary to offer ways to make the calculations quick enough. But modern machines in 2022 just don’t need this quick’n’dirty mode any more. There’s no reason to tolerate pupil aberration any longer. What we do need is better ways to visualize pupil location, shift, size etc in wide-angle systems.

  • Mark


Userlevel 6
Badge +2

To echo Mark’s point, there is no reason not to use Ray Aiming so having Paraxial Ray Aiming on by default is a good choice.  Rather than using Mark’s algorithm, simply turning Ray Aiming on for all sequential systems is preferred since:

  • If there is no power between Object & Stop, then Entrance Pupil and Stop are collocated and there is no iteration in the Ray Aiming algorithm
  • If there is power between Object & Stop, then without Ray Aiming, the “imaginary" Entrance Pupil has uniform (or apodized) illumination while the physical Stop has aberrated illumination (not to mention incorrect Chief ray and centroid calculations).
  • A bigger effort should be made to educate users the difference between Paraxial and Real Ray Aiming.  When using Float By Stop Size (which is the only “physical” representation of a Stop), then these two algorithms are the same.  If the aperture is defined by a paraxial value, then the Stop ‘s diameter is calculated from the paraxial Entrance Pupil by either tracing paraxial rays (Paraxial Ray Aiming) or real rays (Real Ray Aiming).  Except in very narrow cases, Paraxial Ray Aiming is the preferred algorithm since this stems directly from first-order geometric optics.
  • If Ray Aiming fails for any reason:
    • Zemax needs fix the Ray Aiming algorithm because it shouldn’t fail
    • OpticStudio can turn off Ray Aiming in the background and force the user to run the Ray Aiming Wizard to try to troubleshoot.

In summary, with the enhancements Zemax has made over the past 2 years, Ray Aiming should always be used and it should be turned on by default.

Userlevel 7
Badge +3

Yep, I agree. @Tom Pickering?


Userlevel 6
Badge +2

Hello Mark and Michael,

Thank you very much for feedback. I have forwarded this and got some responces from development team.

1. Turn on Paraxial Ray Aiming whenever there is power before STOP

This looks a good idea and I think most of people agree it will work well for most of systems. The only small concern is only there may be cases where the performance impact doesn't yield accuracy improvements to make it worthwhile. I will see if this can be added into the spec.:)


2. Redesign the UI

I agree it now becomes a good option to think since the Enhanced Ray Aiming (ERA) is proven to work well! My opinion is this may not be a best timing because I can see we might have more improvement upcoming, mainly for some edge cases ERA doesn’t solve, which are all off-axis systems. Maybe we can consider to change the UI at the same time by then, although I don’t know how long it needs or even whether this will happen.


3. Turning on Paraxial Ray Aiming by default for new lens

I know it’s a long discussed option. The change is very easy, but I think we are mainly worry that this may solve some problmes and raise others. Here is some comments I got:

Always using Paraxial Ray Aiming are appropriate for most use cases, but there are definitely reasons why it would be preferable to not use even Paraxial Ray Aiming if possible. Some types of systems cause ray tracing to proceed much slower than "typical" purely sag-based systems. The extra overhead with Ray Aiming turned on can be a severe inconvenience or even make doing real work prohibitive.

For example, we have seen examples where STAR-enabled lenses that have temperature-dependent index of refraction run hundreds of times slower than the equivalent system with constant index of refraction. When ray aiming is turned on, the ray aiming overhead needed to setup rays can be a difference maker between being able to work with OpticStudio analyses in a practical timescale or not.

Userlevel 7
Badge +3

Hi Michael,

Thanks for that. I totally get your concerns around the corner cases. We can’t break the code’s ability to handle those weird and wonderful cases that sometimes emerge. I guess I’m really just recommending a different set of defaults.

The current default is to have ray aiming off, which is what Zemax 3.5 back in 1991 or whenever did when it was running on 286 and 386 machines. I think now we can simply default it on. 

With regards to Enhanced ray aiming, I’ve not actually used it much. The changes that were brought in with OS22 mean that the simple Paraxial mode works for me in 100% of the cases I’ve got, and I no longer need either Robust or Enhanced ray aiming. No doubt they should be kept in the code for those special cases.

But bottom line: default paraxial ray aiming ON instead of OFF and it will give the vast majority of users the right set up immediately. For weird systems, by all means still provide other controls.

  • Mark


Badge

Oct 28, 2023 -

Some feedback - support Mark’s suggestion of having the default turned on to at least paraxial.   The time impact of having to chase down which of the N combinations of ray aiming settings works, or evaluate wierd behavior, is much worse than the computational impact during the first evaluation.     I’m at this forum article because still dealing with lots of “corner cases” and figuring them out.

Regards,

John

Userlevel 7
Badge +3

Just curious if this is anywhere near being implemented. Default Paraxial Ray-Aiming ON instead of OFF.

Userlevel 7
Badge +3

BTW, there is an easy workaround for this for users who want to. Just load up Lens.ZMX, or whatever file you have chosen as the startup file, and then turn paraxial ray-aiming ON, and then save the startup file. Then whenever you do File...New, ray aiming will be on.

But to save user time, just default it ON 😎

Userlevel 4
Badge

Hi Mark,

This does not match the way Zemax works for me. It may have partly worked like that some time ago though.

Neither the LENS.zmx or the LENS.zos files in the samples directory are used when pressing the “New” button(*). This button always produces a “factory” file where nothing I have set up is preserved (e.g., I like to have W/m^2 in my units, but this is always back to W/cm^2). And ray aiming is OFF in this.

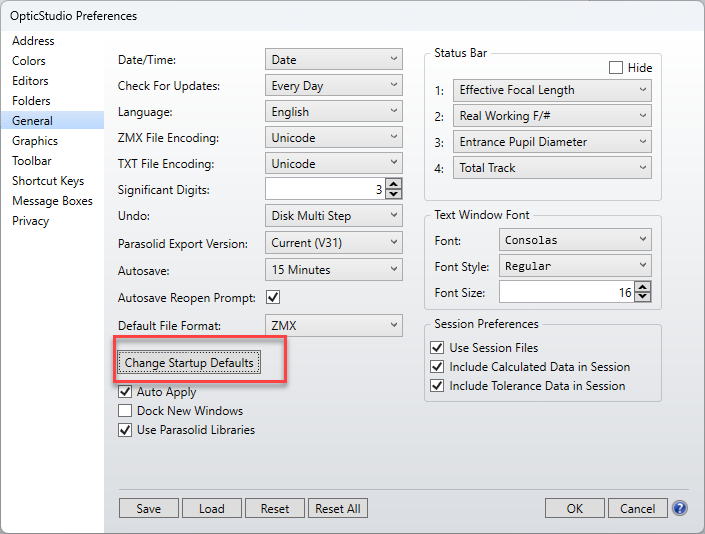
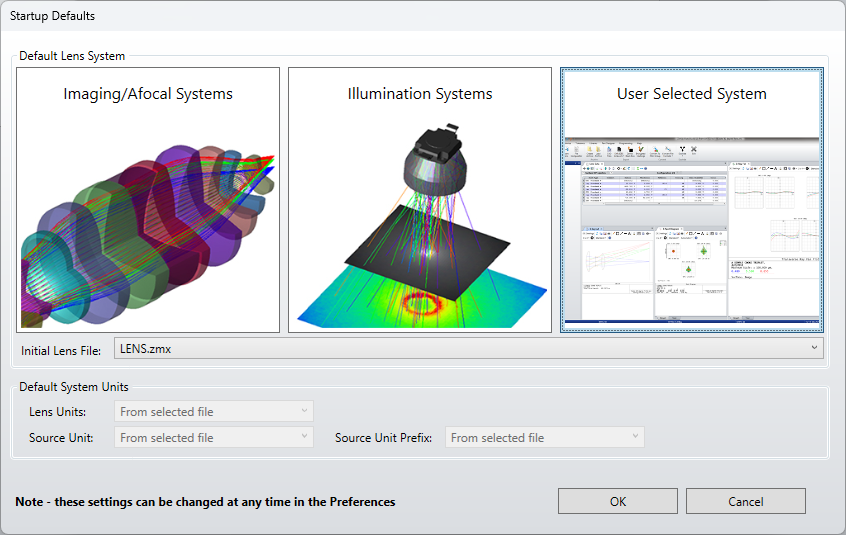
The LENS.zmx/zos files are used as default when starting Zemax, and ONLY IF the user has specifically asked for these to be used via OpticStudio Preferences → General → Change Startup Defaults → User Selected System. If you have chosen the “Imaging/Afocal System” there, the “factory” setting is used again.

Best regards,

Ray

(*) I am pretty sure the “New” button never used the LENS.zmx, because you can easily mess with the file (save your current system on it by mistake) and the “New” button allowed you to start afresh according to my memories.

Userlevel 7
Badge +3

Hi Ray,

You’re right.

Under Preferences, General ypu can change Startup Defaults:

and I chose ‘User Selected System’, lens.zmx

I did File...New to get a new lens.zmx, changed the Ray aiming control to Paraxial, saved, did File...New and it did not work. So I set it to the double Gauss and it still did not work!

I then closed OS and restarted it, and this time it worked...OS loaded the requested file on startup. But doing File...New still gave me the same factory default.

@Tom Pickering , that sounds like a bug to me, or an incredible limitation of what this feature is supposed to do. I can’t see any point in the startup and File...New defaults being different.

Of course, just default the ray-aiming to ON and we’ll say no more about it :-)


Userlevel 6
Badge +2

Hey @Mark.Nicholson , 

This has been the behavior since at least 2016.  I’m not sure if this is a “bug” or just poor testing during implementation, but I agree that clicking new should load the Initial Lens File (otherwise, what’s even the point of being able to select the Initial Lens File).

@Tom Pickering this is one of those extremely easy fixes it would take the dev team less than 1 day to fix but would improve the workflow of countless customers.  Hopefully we can see this “fixed” in the next release.

Reply