I am trying to setup the parameters in Image Simulation analysis. However I donnot know what to choose for oversampling that could make sense with my detector setting.
Image:
I have the input bitmap image, field of stars, with 583x441 pixels in width and height. I have a detector pixel size of 0.0028mm with 8192x8192 pixels. Increasing the oversampling will generate a better simulated picture indeed. But I donot know what should I select for oversampling of the source bitmap to have a realistic simulated image.
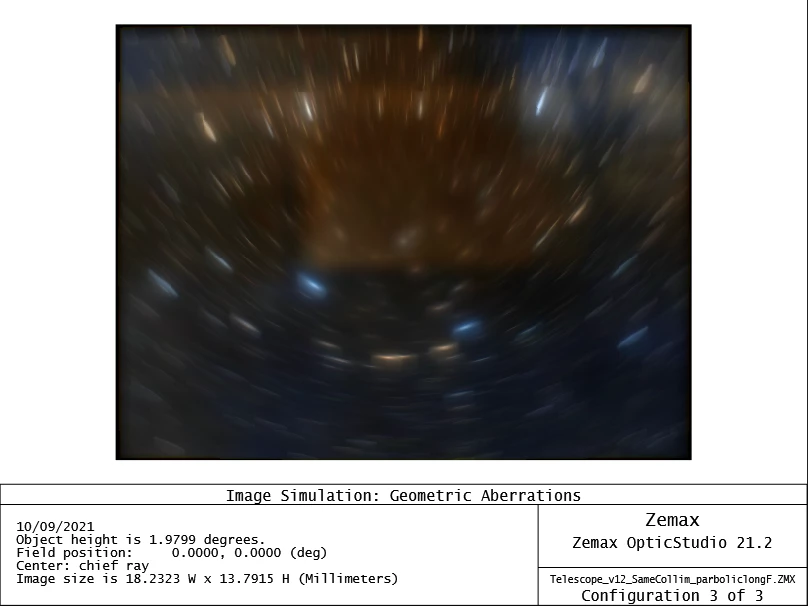
Choosing 16X versus None for oversampling drastically change the PSF and simulated imge of course as below.
Also for the field height, I have defined my fields in incident angles and it is defficult to understand for me what field height I need to choose to cover 441 pixels of the input image.
Thank you
Fatemeh
Best answer by Sandrine Auriol
Hello Fatemeh
The image simulation is a 3-step process:
The 1st one is defining the input image. The screenshot below shows how the image is defined vs the field setting for the Image Simulation: Because you are working in angles, your image will be defined in angles instead of height. I would recommend looking at the help files as there is a section called Comments on using field angles in the“The Analyze Tab (sequential ui mode) > Image Quality Group > Extended Scene Analysis > Image Simulation“ help file. The main difficulty outlined in that help file in using field angle for defining the object field of view is that field angle units are inherently anamorphic. So one degree at 0 degree may not represent the same pixel size as one degree at 10 degrees for example. Sometimes we define the field in field heights with a paraxial lens to avoid that problem.
The 2nd step is the PSF Grid. It is REALLY recommended to check it before going any further. The resolution of the input image will be use for the PSF grid so if the sampling is too low, then the PSF will appear as dots (pixels). Check the size of your PSF with other tools like the spot diagram or the Huygens PSF. This will give you an idea of the sampling needed.
The 3rd step is the detector. You can first check without a detector and then decide on the detector. The image by default has the same number of pixels as the input image, so that gives you a good idea for the detector.
You probably know these references already but just in case:
Have a look at our sample files as they are a good reference on how to set-up the image simulation. Check under \Zemax\Samples\Sequential\Image Simulation
Regarding sampling selection, following answer from Sandrine clarifies the selection.
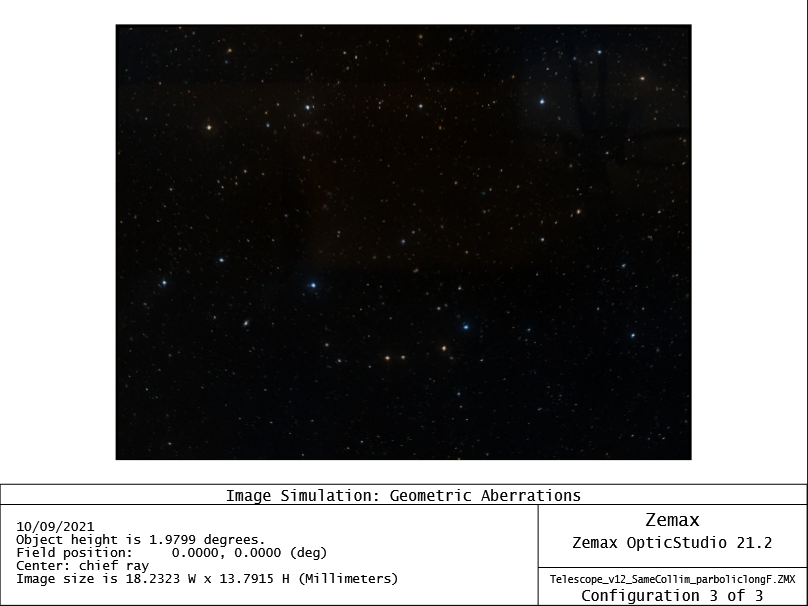
Sandrine Auriol 1st I had a look at the input image:
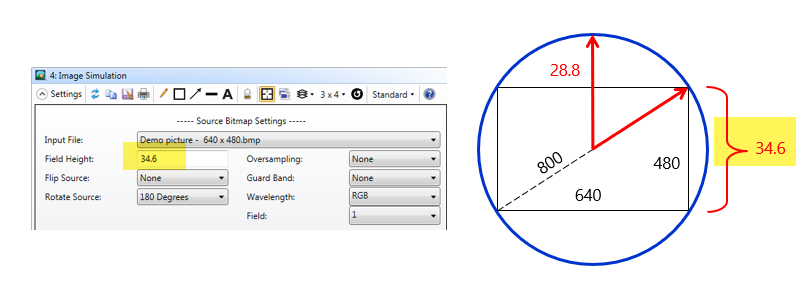
It is 583 pixels width by 441 pixels high. The fields are defined in angles, and the height is 1.9799 degrees. So it means that one pixel is 1.9799/441 = 0.00449 degrees. It is not super easy to work in degrees for the image so at this point I would add a paraxial lens and work with field heights. To do that we can add a surface 1 and set this surface as the STOP. Then I am changing the aperture as Float by Stop size. I then change this surface to a paraxial lens and set the object thickness to 100mm. The paraxial lens has a focal length of 100mm. Then I can just use the tool to convert from object angle to height. I am just changing the Y angle because it is 1.9799/2 (the field height that was defined in the image simulation):
Once converted I have:
So I'll set the object height in the Image Simulation to 1.727960 * 2 = 3.46mm. So the image height is 3.46mm and the number of pixels is 441 so the pixel measures roughly 8um.
A quick look at the OPD tells me that the system is not diffraction limited so I will stick to geometric rays. So now let's look at the size of the spot. The RMS spot radius are between 50 to 300um so the input image is enough sampled.
Now let's have a look at the PSF Grid:
That looks good to me. And now the simulated image:
So the final image is 18mm W x 14mm H roughly. And there are 441 pixels in height so a pixel at the image is 32um roughly.
In your forum post, you were mentioning that your detector had a pixel size of 0.0028mm with 8192x8192 pixels. So we can see here that the system is not detector limited so we can add the detector but it won't give us more information as we see here that the optics is the limiting factor in terms of image quality.