I'm looking for a quick way to retrace rays in OpticStudio (“Clear & Trace”) that doesn't require 3 mouse clicks. A button or shortcut doesn't matter. My current workflow is:
open the modal dialog Ray Trace Control,
hit the button
close the dialog knowing that I'll have to reopen it in a couple seconds after adjusting parameters.
The simplest fix would be to keep the Ray Trace Control dialog always open, but it's modal so it locks the main window while open.
Any good advice for iterative processes involving ray tracing?
Thanks, Matthias
Best answer by MichaelH
Hi Matthias,
The main reason why the Ray Trace dialog is modal is because the tracing needs to be done on a static system. OpticStudio cannot “understand” what it means if a user changes something in the NCE during a ray trace...should the change be applied to the original ray trace or should a new ray trace start? So, from a GUI standpoint, a ray trace needs to be modal. The reason why the dialog doesn’t disappear afterwards is a deliberate choice made for a few reasons:
There is direct information about the ray trace displayed in the dialog (trace and threshold errors)
Back in the 90’s, a lot of programs used the CPU’s “beep” function to alert the user that the process is finished. This is why you cannot silence a “beep” from a ray trace (except to disable all sound, plug in headphones, or install a 3rd party software to silence OpticStudio). The “beep” function was designed to let you know the ray trace was complete, for the user to check the errors, and either accept the results as is or modify the design (by clicking OK, the user actively accepts one of these 2 scenarios).
There is no programmable logic which can predict if a user needs to rerun a ray trace and if so, what parameters need to be adjusted. If this is something that is predetermined, then the ZPL/ZOS-API should be used rather than the GUI interface (which requires user acknowledgement at specific times).
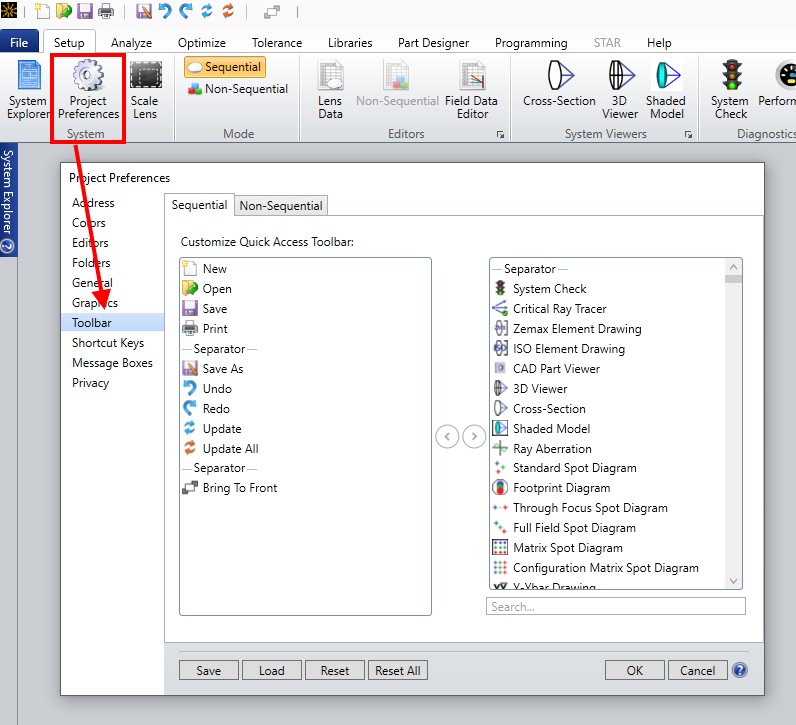
The NSTR ZPL keyword allows you to script up a ray trace without having the modal dialog (the ZPL itself is still modal but will disappear when the ZPL is finished). If you create a ZPL ray tracing routine, then you can add the ZPL to the quick actions Toolbar and the Project Preferences:
I can do it with a single mouse click assuming you have a way to assign a macro to your mouse and the ray trace duration is more-or-less constant. Basically, when you work on the UI with the keyboard, you can do the actions you mentioned by:
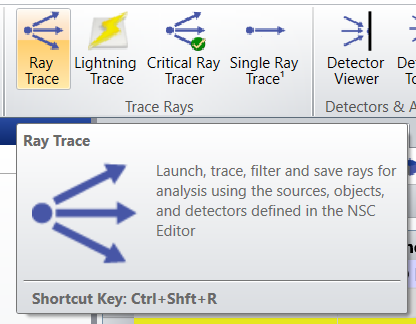
Pressing Ctrl+D (default short for Ray Trace)
Pressing ENTER (Clear and Trace has the focus by default when Ray Trace is opened)
Waiting for the ray trace to finish (this is the arbitrary part)
Pressing twice MAJ+TAB (brings the focus to the Exit button)
Pressing ENTER (to exit the Ray Trace)
The only bottleneck is that this method is asynchronous and it doesn’t know when the ray trace finishes. Therfore, you need a pause in the macro after launching the ray trace and before focusing on the Exit button.
There are multiple ways of getting this into a macro and asign it to your mouse or keyboard. Some people like AutoHotKey (free, macros need to be programmed with custom langage), or reWASD (licensed, user-interface makes it slightly more intuitive), I personnally work with a gaming mouse, which comes with its own control software including the possibility to assign macros to the mouse buttons.
Whatever the method you choose to go for, the macro should do something like so:
Ctrl+D and wait 200 ms
ENTER and wait <ray trace duration> ms
MAJ+TAB and wait 200 ms
MAJ+TAB and wait 200 ms
ENTER
Alternatively, you could make a ZOS-API user-extension that runs the ray-trace, and then you bind a macro to call that user-extension from within OpticStudio. The big advantage is that this method will be synchronous. Meaning you don’t need to stipulate arbitrary pause for the Ray Trace.
Here is a sample code you could use to do just that:
// Open the Ray Trace tool
INSCRayTrace TheRayTrace = TheSystem.Tools.OpenNSCRayTrace();

// Clear all detectors
TheRayTrace.ClearDetectors(0);

// Apply Ray Trace properties if necessary
TheRayTrace.IgnoreErrors = true;

// Run the Ray Trace
TheRayTrace.RunAndWaitForCompletion();

// Close the Ray Trace tool
TheRayTrace.Close();
In my example, I’ve compiled this to a file RAYTRACE.exe (attached to my answer, the file should be copied in your {Documents}\Zemax\ZOS-API\Extensions folder), and it can be called from within OpticStudio under Programming..User Extensions..RAYTRACE.
The way to then map a macro onto this drop-down list is by first pressing ALT, doing so will show you the letters assigned to the different menus of OpticStudio. For the Programming tab, it is letter P. Then, for User-Extensions it is letters EAL. Then, you need to check in your list of user-extensions where the RAYTRACE is, in my list, it is the sixth element. Therefor, I can have a macro like so:
Thank you for your prompt reply! But…. WHY do we have to go through such great lengths for such basic functionality? Clearly the program authors were aware that this is a default chain of actions. Cheers, Matthias
I don’t have an answer to your question. Perhaps you could write to Zemax Support (support@zemax.com). They’ll probably ask you to detail your workflow and explain what difference this feature would make for you and other potential users.
The main reason why the Ray Trace dialog is modal is because the tracing needs to be done on a static system. OpticStudio cannot “understand” what it means if a user changes something in the NCE during a ray trace...should the change be applied to the original ray trace or should a new ray trace start? So, from a GUI standpoint, a ray trace needs to be modal. The reason why the dialog doesn’t disappear afterwards is a deliberate choice made for a few reasons:
There is direct information about the ray trace displayed in the dialog (trace and threshold errors)
Back in the 90’s, a lot of programs used the CPU’s “beep” function to alert the user that the process is finished. This is why you cannot silence a “beep” from a ray trace (except to disable all sound, plug in headphones, or install a 3rd party software to silence OpticStudio). The “beep” function was designed to let you know the ray trace was complete, for the user to check the errors, and either accept the results as is or modify the design (by clicking OK, the user actively accepts one of these 2 scenarios).
There is no programmable logic which can predict if a user needs to rerun a ray trace and if so, what parameters need to be adjusted. If this is something that is predetermined, then the ZPL/ZOS-API should be used rather than the GUI interface (which requires user acknowledgement at specific times).
The NSTR ZPL keyword allows you to script up a ray trace without having the modal dialog (the ZPL itself is still modal but will disappear when the ZPL is finished). If you create a ZPL ray tracing routine, then you can add the ZPL to the quick actions Toolbar and the Project Preferences: