May 31st, 2022
1 Tools, Features, and Capabilities
1.1 Ray Aiming Wizard (All Editions)
Get advice on which Ray Aiming settings to choose for your system.
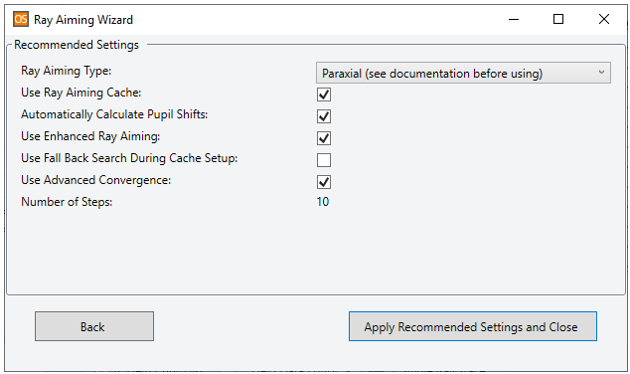
This tool provides the data you need to determine the optimal ray aiming settings for your system, including those settings associated with Enhanced Ray Aiming (an algorithm introduced in OpticStudio 22.1 specifically designed for applications that require a wide field-of-view, such as machine vision, surveillance cameras on drones, cameras for autonomous vehicles as well as cell phone lenses). With the new Ray Aiming Wizard, you will know when and how to use ray aiming for accurate system analysis and modeling. You can find this tool in the Ray Aiming section of the System Explorer in sequential mode.
After running the Ray Aiming Wizard, a text report is generated. There are four main sections in the report:
- Basic system information: File name, system aperture and field settings.
- Recommended Settings: The recommended list of ray aiming settings.
- Decision Metrics: A summary of how the Ray Aiming Wizard tested the system and found the recommended settings.
- Raw data: The data used to make each decision shown in the previous section.
After reviewing the recommended settings, you can simply apply them with the click of a button and close the tool.
While the Ray Aiming Wizard is a powerful tool to assist with setting up all systems for which ray aiming is required, it is especially useful for systems in which a poor choice of ray aiming settings can lead to unexpected behavior (such as discontinuities in analysis results or missing rays). However, please note that it can be true that no combination of Ray Aiming settings will resolve such unexpected system behavior, and in these cases the Ray Aiming Wizard will not provide recommended settings.
1.2 Enhanced Ray Aiming Improvements (All Editions)
Additional Field and Aperture types are now supported
Enhanced Ray Aiming now supports a broader range of optical systems as it can now be used with more aperture and field types. In addition to Float by Stop Size, Enhanced Ray Aiming can now be used when the system aperture is Entrance Pupil Diameter or Image Space F/#. These are critical additions to enable traditional lens designs.
- Controlling the Entrance Pupil Diameter is particularly important in situations where a limited amount of illumination is available, e.g. in low-light systems such as night vision systems, microscopy, machine vision systems, traditional photography, as well as some AR/VR systems.
- As the Image Space F/# controls the size of the PSF and thus system resolution, this Aperture setting is used for diffraction limited systems such as telescopes, microscopes, and objectives for close-up photography.
Previously, the Field Type was limited to Angle and Theodolite Angle with infinite object distances, and Object Height with finite object distances and ray angles less than 90°. Now, Field Angle and Theodolite Angle are also supported with finite object distances. This is mostly useful for wide angle systems with a field of view greater than 180 degrees, e.g. security cameras and fisheye lenses for photography and surveying
These improvements expand the range of designs where this new algorithm can help address issues such as “cannot trace” errors and discontinuities in analyses.
1.3 Export to Speos Lens System (Professional and Premium Editions)
Create a reduced-order model of the current optical system to be used in a Speos simulation.
Ansys Speos is often used to integrate component-level designs into a comprehensive system simulation for rendering and visualization. One example is the integration of camera sensors designed with OpticStudio, as described here: https://www.zemax.com/blogs/news/zemax-and-ansys-collaborate-to-enable-safer-reliable-autonomous-vehicle-navigation. Data transfer from OpticStudio to Speos was previously supported through a separate tool (the Speos Lens System Importer) but starting in the 22.2 release the required data model can now be created directly from OpticStudio. The generated model includes the relevant parameters of the optical system to enable accurate optical sensor simulation in a realistic environment.
To calculate the reduced-order model, all you have to define are sensor width and height, the number of sample points, and the number of probing rays. The Ansys Speos distortion file will be computed and the Export to Speos Lens System tool reports timing, computed sample points, pupil vector, pupil radius, focus distance for the respective pupil, optical system efficiency for the given pupil, and ray divergence. The tool currently only supports rotationally symmetric systems.
You can find the tool in The File Tab...Export Group...Export to Speos Lens System.
1.4 STAR: New Performance Analysis (Professional and Premium Editions, Subscription Only. Requires the STAR Module License)
Find out how temperature changes and deformations contribute to a change in system performance.
The Performance Analysis enables you to see how temperature changes and deformations are contributing to the overall change in optical performance in the system on a surface-by-surface basis. The tool works by sequentially turning on and off the FEA datasets and monitoring the change in the specified performance metric (RMS Wavefront Error or RMS Spot Size).
Furthermore, the analysis will differentiate between the performance change contributions from 2D structural deformations and 3D temperature data. The result is the ability to not only see which surface(s) are contributing the performance change but also the nature of that change.
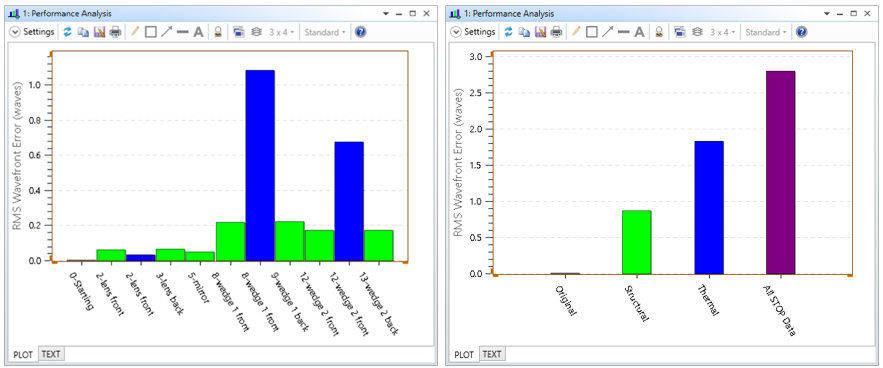
This analysis enables the study of how the temperature change and deformation of each surface individually change the system performance, the cumulative performance as each surface is added, as well as how all effects combined change the system performance. Finally, the text tab lets you easily inspect and copy the data.
1.5 Convert ZRD or ZBF to TSV (Professional and Premium Editions)
Analyze ZRD or ZBF files without the need for MATLAB.
This tool reads the data from a ZRD file or a ZBF file and then writes it to a tab-separated value (TSV) text file. This feature replaces the previous Convert to MAT tool, which only wrote the output to native MATLAB. The output file of the Convert ZRD or ZBF to TSV tool is program-agnostic and can therefore be used in any post-processing software. While the presence of a MATLAB installation is no longer required for this functionality, the TSV text files can be post-processed with MATLAB (as well as any other tool that can read TSV files).
1.6 Creo 7 Dynamic Link Support (Premium Edition)
Dynamically modify and optimize parts and assemblies created with PTC Creo Parametric 7.
OpticStudio Premium can dynamically open PTC Creo Parametric part and assembly files in Non-Sequential Mode in order to model and parametrically control objects that aren't easily modelled by primitive or common shapes. The native CAD part is easily incorporated into the Non-Sequential Component Editor using the associated object type. Any explicit dimensions defined on the object can be exposed and controlled within the Non-Sequential Component Editor. This will allow optical engineers to be able to work with the same files that their mechanical engineers use, without the need for format conversion.
OpticStudio now supports dynamic links to PTC Creo Parametric 7, as well as to the following legacy releases of the software: Creo Parametric 6, 5, and 4. To modify the Creo version to be used, simply set the path to your preferred Creo installation in the OpticStudio Preferences.

1.7 Improved ZMX File Type Support (All Editions)
Set your preferred default file format.
You can now set default file format in the OpticStudio Preferences to either the modern binary file format (ZOS) or the legacy text-based file format (ZMX). This way, OpticStudio starts a new lens file and saves it in your preferred format. Both file formats now also support all features and previous warnings about the deprecation of the ZMX format have been removed.
1.8 New Binary Lens Catalog File Format (All Editions)
Convert a folder full of ZOS files to a stock lens catalog file.
The Make Private Catalog tool now also supports binary ZOS files in addition to text-based ZMX files. This tool is used to convert a folder full of ZOS or ZMX files to a stock lens catalog file. If the folder contains ZMX files the tool creates a catalog with a ZMF file extension (as before), but if the folder contains ZOS files the tool creates a catalog with a new file extension (ZLC).
To access the tool, go to The Libraries Tab...Stock Parts Group...Make Private Lens Catalog.
1.9 More File Types Supported By Project Directories (All Editions)
The Project Directory now supports even more of your files.
Introduced in OpticStudio 21.3, the Project Directory system enables easy packaging and storage of important Zemax files so that they can be easily accessed and manipulated on a project-by-project basis. A Project Directory can be created from an existing OpticStudio design by using the Convert to Project Directory button in the File tab.
With OpticStudio 22.2, Project Directories now also support the following file types:
- Grid files (.GRD)
- EULUMDAT source files (.LDT)
- Tolerance files (.TOP, .DLL)
- Black Box files (.ZBB)
- User-Defined Aperture files (.UDA)
2 Libraries and Catalogs
2.1 Catalog Updates (All Editions)
Get the latest catalog updates from Ohara, Qioptiq Asslar, and MKS Instruments.
Materials
- The Ohara materials catalog has been updated to include 6 new materials and updated transmission data for PBL35Y.
Testplates
- The Qiotpiq Asslar Test Plate List has been updated to include more than 200 new test plates.
Coatings
- The Coating.DAT file has been updated to include the ZEC_AR-16 coating by MKS Instruments.
3 Bug Fixes
- Prepare for OpticsBuilder - Fixed an issue where the tool incorrectly converted STOP surfaces which either were a dummy surface or had a non-zero mechanical aperture value.
- STAR - Fixed an issue where thermal FEA data could cause ray traces to fail.
- Paraxial Ray Tracing - Fixed an issue where checking for ray vignetting in Black Box surfaces could result in ray tracing errors.
- ZOS file type - Fixed an issue where ZPL Solves were incorrectly stored in the ZOS file format.
- ZOS file type - Fixed an issue where the Consider Objects and Ignore Objects settings in the Non-sequential Component Editor Properties were not stored in the ZOS file format.
- STAR FEA Data Viewer - Fixed an issue in the STAR FEA Data Viewer, where the results were displayed incorrectly when the decimal symbol in the Windows Region settings was set to a comma instead of a period.
- Prepare for OpticsBuilder - Fixed an issue where CAD Part: Creo Parametric and CAD Assembly: Creo Parametric objects were incorrectly marked as unsupported in the Prepare for OpticsBuilder tool.
- RCWA DLLs - Fixed an issue when calculating power of each order in stochastic mode. Previously, the power was wrongly calculated as Ex^2+Ey^2+Ex^2.
- STAR - Fixed an issue where Layout Plots did not show the correct ray direction after exiting a lens with thermal data added to its front surface.
4 Known Issues
- Dynamic Link – For users that have OpticsBuilder for Creo installed on the same computer as OpticStudio and wish to use the OpticStudio CAD dynamic link with Creo Parametric 7, there is a known issue that requires your attention to resolve. In some circumstances the dynamic link to Creo Parametric 7 will fail to connect while creating or loading a CAD Part: Creo Parametric or CAD Assembly: Creo Parametric object in OpticStudio, causing the OpticStudio application to become unresponsive. To prevent this behavior, you should open Creo Parametric 7 and check whether you see either (or both) of the warning messages shown below. For each warning message you should check the box “Remember this decision” and then click “Yes”.